This blog post will combine some of the best resources that i could find regarding server setups and best practices. Services will include web server (http), ssh, ftp etc. Of course you can find these on your own but why go through dozens of search engine results just to find that 80% of them aern't that useful, when I've done most of the hard stuff for you :).
SSH server (openssh):
Link 1: cyberciti.biz
Link 2: howtoforge.com
Link 3: teknoteknik.wordpress.com
FTP server(vsftpd):
Link 1: Ubuntu Server documentation
Link 2: brainsware.org vsftpd virtual users
Link 3: Centos.org vsftpd config options
Link 4: SFTP vs FTPS
Web Server (apache):
Link 1: apache.orgs tutorial collection (Best list)
Link 1: yolinux.com
Database server (mysql):
Link 1: ubuntu server documentation
Link 2: greensql.com
dhcp server (dhcpd):
Link 1: Ubuntu server documentation
Link 2: Article at consultingblogs.emc.com (very good read)
As i find more interesting articles, i will update this blog post. If you are interested in implementing any of the above services or just looking for some best practices, hopefully you will find these resources useful as i have.
Wednesday, January 11, 2012

Sunday, January 1, 2012
Binary Kung-Fu - Manually create a working windows PE file using a hexeditor
Sure you can open up visual basic or visual c++ and write your own exe in less than 5 minutes. Why would you want to do this manually with a hex editor? Well for one its fun doing this for the first time on your own, but most importantly, it teaches you a heck of alot. You learn what makes up an exe and how windows uses the data in the executable to map things into memory, etc. It goes without saying that the more you know about something and how it works, the better you will be at fixing potential problems that may arise and also manipulating the component to do other things that it wasn't intended to do in the first place (i.e hacking).
Who might find this useful or where might this knowledge be implemented?
1. Reverse Engineering.
2. Malware Analysis. Malware authors tend to do some pretty darn cool tricks with the PE headers, like actually writing/hiding code in the headers itself.
3. Antivirus research.
4. Exploit research
What you will need.
1. Windows OS. I used windows XP service pack 2 in virtualbox.
2. A hex editor. The one i'm most familiar with is HxD which is freeware.
3. LordPE (edit PE file headers).
4. PE file format reference. You can google "pe file format" and you should get some useable documents. I like the one at pentest.cryptocity.net.
At this point, you should look up the meaning of "little/big Endian" with relation to x86 processors. Certain values in PE files are interpret by windows in a sort of reverse order. For example, a dword (4 bytes) to represent the value of two will be "02 00 00 00". When windows reads this dword, it reads it in reverse as "00 00 00 02".
The first thing to do is open up your hexeditor and create a new project. One important thing that you should be aware of is that although the PE file header can be complex, not all of the fields are of importance to us in order to getting our executable running. However, that doesnt mean we will omit them from the header. We will just have to pad these fields with zeros.
Ok lets start...
Every PE file requires a DOS header. If you analyze most PE files, you will notice like within the first 100 bytes or so, there is some text saying something along the lines of "This program must be run under win32". The DOS header is there for backwards compatibility on 16bit DOS systems. If you attempted to run a win32 program in 16bit DOS, then it will simply print that message then quit.
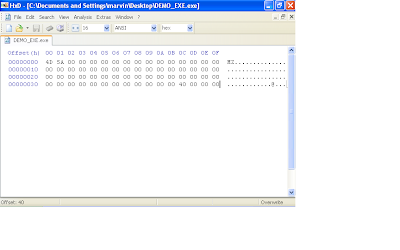
In the windows 32bit environment, the windows loader only cares about two fields in the DOS header. The first 2 bytes should be "MZ" and the last 4 bytes contains the offset within the file where the PE header starts. The DOS header is 64 bytes long (0x40).
Note: that you would notice the last 4 bytes (as shown in the image below) are "40 00 00 00". Remember the little indian description i gave earlier? When windows reads this file, its gonna take those 4 bytes and flip it around so as you'll get "00 00 00 40" or 0x00000040 (hexadecimal 40). This means that at offset 0x40, windows should look for the PE header.
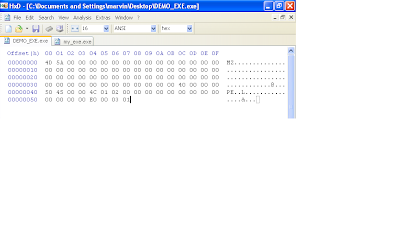
The next 24 bytes will have the PE signature and image file header. You will notice that i didn't input the typical DOS message "This program must be run under win32", after the DOS header because like i mentioned before, in a win32 environment, the windows executable loader only looks for two things in the DOS header (the MZ signature and the pointer to the PE header (This pointer is at offser 0x3c in the DOS header ) . Also note that we will zero out some of the fields in the image file header. Remember the DOS header is 64 bytes (0x40) long so therefore we will start with the PE signature here at offset 0x40.
In the hex editor, append 24 bytes of zeros to your file so we have the correct length in place for this structure that holds the PE signature and image file structure. Now at offset 0x40, overwrite the first 4 bytes with "50 45 00 00", which is the "PE" signature. At offset 0x44, write "4c 01". This here means that this program is intended to be ran on an intel i386 platform. The next two bytes are the number of sections. We are gonna use two sections, so write "02 00". The next 12 bytes are not important so just leave them zero'd out. At offset 0x54, enter "E0 00" and at offset 0x56, enter "03 01". Offset 0x54 is important and specifies how big the next structure beginning at offset 0x58 should be (this structure is the NT_OPTIONAL_HEADERS field). We derived this value by adding the size of the optional NT header which is 0x60 (96 bytes) and the size of the image data directories. Each entry in the data directories is 8 bytes long and we have up to 16 entries (this equates to 128 bytes). So 96 plus 128 bytes is 224 bytes (or 0xE0). Offset 0x56 is rather complicated. The values in this field can determine whether this file is a dll or executable, if a 32 bit machine is expected and so forth. Its best to observe this field in LordPE. I copied the values for this field in another executable "03 01".
 Since we specified in at offset 0x54 that the NT optional header was gonna be 224 bytes (0xE0) long, lets pad our file with 224 bytes as well. Remember, in our file, the NT optional header structure starts at offset 0x58.
At offset 0x58, enter bytes "0B 01". These two bytes tells windows that this is a PE32 file.
From offset 0x5A, the next 14 bytes are not important and can remain all zeros. This takes us to offset 0x68. This field is a dword (4 bytes) and takes an RVA (Relative Virtual Address). An RVA is an offset that is added to a base address. For example, if a base address is 0x00400000 and the RVA to a function named "OpenFile" is "2000", then this equates the function being located at 0x00402000. There are quite a few fields that contain an RVA, but just remember that an RVA is always an offset that is added to the base address (the base address will be defined shortly is the NT optional header) in order to find the location of that object in Virtual memory. RVA's never point to an offset in the executable file. Lets get back on track. At offset 0x68 we will write a dword for an RVA representing the AddressOfEntryPoint (address of entry point is where our program will begin executing code after it is loaded into memory). We write "00 10 00 00". The next 8 bytes are not important so leave them zero'd.
We are now at offset 0x74. This field is the image base that i refered to before as i was explaining RVAs. This field takes a dword and i will use " 00 00 40 00".
The next 8 bytes define the section alignment and the file alignment respectively. They are both dword values. We will keep them the same for simplicity, "00 10 00 00" and "00 10 00 00". It is hard to find the right words to explain section and file alignment, although the concept is quite simple, but i'll try. Imagine a executable file with three sections, each named A, B and C. Sections are like containers, each with a different purpose. Section A can contain the assembly code, section B can contain strings that the programmer hard coded (like passwords, error messages, message box strings, etc and section C can also contain other data. Its not hard to tell that these sections are treated differently, one can be interpreted as code, the others as data. Because of this, sections have attributes, like read, write, execute, etc. Section/file alignment aids the windows loader in identifying the boundaries of each section, so that it correctly knows which parts should be executable and which parts shouldn't. For instance, we have a base image that we defined earlier of 0x00400000. We can have a section alignment of 0x1000. What this means is that we can have a section located at 0x00401000. Lets say section A had 0x50 bytes of code in its section, because of section alignment value of 0x1000, the next section, section B, will reside at 0x00402000. What if section B had 0x15o0 bytes of data. Doing the math, since section B starts at 0x00402000 + 0x1500 0f data, we get 0x00403500. Because thing are alingned at blocks of 0x1000 bytes, section C will begin at 0x00404000. All the while we were talking about section alignment, we were referring to how things are aligned in memory. The file alingment represents how the sections are aligned in the file. For simplicity sake, i gave it the same value as with the section alignment.
We should now be at offset 0x80. The next 28 bytes define fields that are not important to us so leave them filled with zeros.
Update: Actually the definition at offset 0x88 (MajorSubsystemVersion), is a necessary field. This field is two bytes and i used "04 00". Another important field is the SizeOfHeaders field at offset 0x94. This is also an important field, and thankfully, lordpe can populate this field for us quite easily by the push of a button.
This brings us to offset 9c. This field takes a word (2 bytes) that define the subsystem (this indicates if this will be a console application or gui application, etc.). For console mode, we enter the values "03 00". The next 22 bytes can remain zero'd out. At offset 0xB4, this field represents (NumberOfRvaAndSizes) which indicates how many entries will be in the Data directory structure. I will be using the values "10 00 00 00" to indicate 0x10 which is 16 in decimal. This means the windows loader expects to find an array of 16 entries in the image data directory structure which follows next.
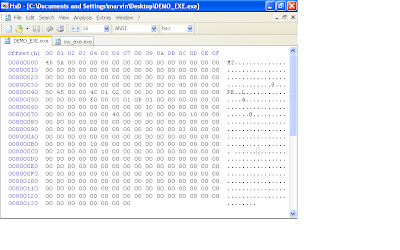
We should be at offset 0xB8 ready to initialize our data directory structure. Each entry consists of two dwords (8 bytes). The first list an RVA and the second is a size. We are only interested in adding an import table which is the second entry in the data directory structure. Therefore the first 8 bytes will be zero's, the next 4 will contain the RVA for the import table and the next 4 will define the size of the import table (our import entry RVA will be "00 20 00 00" and we will set the size to "00 10 00 00" ). The remaining 112 bytes represent the rest of the data directory structure and will remain zero'd out. We should now have a hexdump that looks like this.
 Next we're onto the final stage of defining our PE header. This will include the section header definitions, If you recall earlier, we defined our NumberOfSection's field in the file header section as "02 00", so therefore, we are expected to define two sections in the section header. Each section is 40 bytes so lets go ahead and add 80 bytes to our file. Again not all fields in this structure are important to us so some will remain zero'd out.
We are currently at offset 0x138 where we will begin our section header definitions. The first 8 bytes are reserved for the section header name. Following good practice, we will make sure we dont use over 7 bytes, just so that our string is null terminated. We will call our first section "code" and append the remaining 8 bytes like so "63 6F 64 65 00 00 00 00". The next 4 bytes is the virtual size definition, and we will set it "00 10 00 00". The next 4 bytes is the RVA for this "code" section. We will use "00 10 00 00". Remember, RVAs get added to the base address, which in our case is 0x00400000, which will result in 0x00401000 being the location in memory where this code "section" will be found. So based on our definition so far, the virtual address for the "code" section is 0x00401000 and its size is 0x1000 (0x00401000 + 0x1000 = 0x00402000). In reality this section can be any size, but due to our definition in the section alignment field (defined in the NT optional header), the sections will always be aligned in blocks of 0x1000. Therefore our second section will begin at 0x00402000 because our section size is less than 0x1000.
Ok, the next 4 bytes define the size of the raw data (data on disk or in the file, not virtual size). Lets give it "00 10 00 00". The next 4 bytes indicate the offset to this section in the file (not in memory). Lets give it "00 10 00 00". The next 12 bytes will be left with zeros. Now the last 4 bytes of our first section header definition indicates the attributes this section should have, like read, write, execute, etc. This field is quite complex and you can use LordPE to help obtain the value you need. Open up another exe in lordpe and observe the section characteristics each section of that executable posses. LordPE will give you the 4 bytes that represent the resulting characteristics of that section. You can simply copy this to your exe.
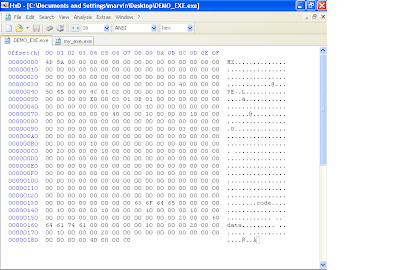
Do the same for the second section header definition, but note that the RVAs and size of raw data definitions will be different. This is what your hexdump should look like at this point after adding the second section header definition.
LordPe should be able to parse your file now so open it up. LordPE can help point out your mistakes, and allow you to potentially correct them from in there.
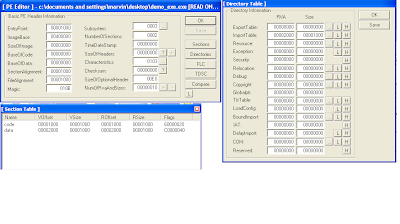 You will notice that the size of image is now 0x3000 in LordPE, even though we didn't define it. Thanks to LordPE, it was able to parse the headers and determine what the image size should be. LordPE can also calculate the SizeOfHeaders field and the checksum field automatically for us (in my tests, the checksum field was not necessary and could be left all zero'd).
We have completed defining our PE headers, but we are not finished with the exe. With our two section definitions, we definied some fields, size of raw data and a pointer to raw data. According to our definitions, we should have a text and data section of size 0x1000 (4096 bytes). The text section has a pointer to raw data at file (not virtual) offset 0x1000, while the data section has a file offset of 0x2000. This means that when windows attempts to parse the file it will look at our section header definition and see that the sections are pointing to offsets that dont exist, at least at this point (our file size is not even half of 0x1000 at this point). We will need to pad our file with bytes in accordance to what we indicated in the section headers. Since our last section is the data section, and its size was indicated to be 0x1000, our total file size should be the pointer to raw data of the "data" section + size of raw data for the "data" section as well (0x2000 + 0x1000 = 0x3000). Lets fill or pad our file with zero's till our file size is 0x3000.
IMPORTANT: I cannot stress enough how important it is that you get this file size right. If your file was 0x3001 bytes in size or 0x2FFF (basically if its not exactly 0x3000)and you try to run your file, windows will give you an error saying that the file is not a proper exe file. Basically windows parsed the headers and found a discrepancy between what the header says the file size should be and what it actually is on disk.
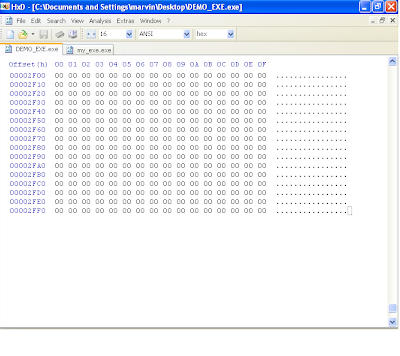 So far, we should have a good executable that windows will be able to accept and parse. However, this program has no code and will crash. If you open up this file in a debugger like ollydbg, it will open up successfully (if you made a mistake following the steps before, ollydbg would not be able to open the file).
You will be dropped to the address of entry point (remeber the rva was 0x1000, therefore the base address 0x00400000 + 0x1000 = 0x00401000). This is essentially the "code" section that we defined earlier. Windows is expecting to execute code here but initially, all that is there is a bunch of zero's. Therefore the program crashes. We will need to write meaningful code here. The simplest program i can think of as of this writing was to write code that simply exits. This wouldn't do anything of significance but at least our program will no longer crash as the ExitProcess kernel32 api will cause our program to exit gracefully. To get this functionality, two more things need to be done.
1. We need to define an image import structure for our kernel32.dll. This will have a pointer to another pointer that will point to the "ExitProcess" api found within kernel32.dll.
2. We will need to write code that will simply call the function. Generating the relevant code can be made simple by using a debugger like olly. Here are the bytes that i used at offset 0x1000, i.e, the "code" section and also the AddressOfEntrypoint RVA. "FF 15 70 20 40 00". You can see screen shots of how i set up offset 0x1000 and 0x2000 in my file.
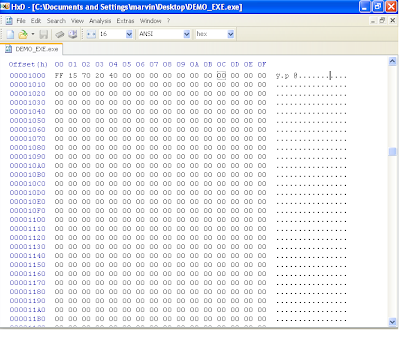
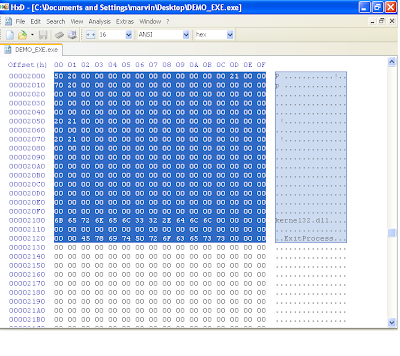
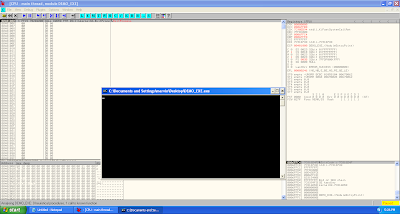
Congratulations !!!. At this point, you should have a working PE executable file that simply just exits. If you wanted more functionality, you would need to import DLLs. Therefore, you would need to make sure that each dll has an entry in the image import descriptor structure (in our example, we only had one for kernel32.dll) and then the functions that these dlls provide must be defined like we did with "ExitProcess" (Note that function names ARE case sensitive). The rest is dependent on your assembly skills, to manipulate the registers and setup the stack for the relevant functions calls to make a reasonable program.
I hope this was helpful to some and would be used as a reference for researchers. I recommend reading the following references below as they've provided me with all the necessary information that i need to succeed at this binary hackery.
Resources / Good Reading:
Hxd hex editor
Tiny Pe project
Pentest.cryptocity.net PE format PDF
LordPE
Microsoft PE Header structure definitions
Who might find this useful or where might this knowledge be implemented?
1. Reverse Engineering.
2. Malware Analysis. Malware authors tend to do some pretty darn cool tricks with the PE headers, like actually writing/hiding code in the headers itself.
3. Antivirus research.
4. Exploit research
What you will need.
1. Windows OS. I used windows XP service pack 2 in virtualbox.
2. A hex editor. The one i'm most familiar with is HxD which is freeware.
3. LordPE (edit PE file headers).
4. PE file format reference. You can google "pe file format" and you should get some useable documents. I like the one at pentest.cryptocity.net.
At this point, you should look up the meaning of "little/big Endian" with relation to x86 processors. Certain values in PE files are interpret by windows in a sort of reverse order. For example, a dword (4 bytes) to represent the value of two will be "02 00 00 00". When windows reads this dword, it reads it in reverse as "00 00 00 02".
The first thing to do is open up your hexeditor and create a new project. One important thing that you should be aware of is that although the PE file header can be complex, not all of the fields are of importance to us in order to getting our executable running. However, that doesnt mean we will omit them from the header. We will just have to pad these fields with zeros.
Ok lets start...
Every PE file requires a DOS header. If you analyze most PE files, you will notice like within the first 100 bytes or so, there is some text saying something along the lines of "This program must be run under win32". The DOS header is there for backwards compatibility on 16bit DOS systems. If you attempted to run a win32 program in 16bit DOS, then it will simply print that message then quit.
In the windows 32bit environment, the windows loader only cares about two fields in the DOS header. The first 2 bytes should be "MZ" and the last 4 bytes contains the offset within the file where the PE header starts. The DOS header is 64 bytes long (0x40).
Note: that you would notice the last 4 bytes (as shown in the image below) are "40 00 00 00". Remember the little indian description i gave earlier? When windows reads this file, its gonna take those 4 bytes and flip it around so as you'll get "00 00 00 40" or 0x00000040 (hexadecimal 40). This means that at offset 0x40, windows should look for the PE header.

The next 24 bytes will have the PE signature and image file header. You will notice that i didn't input the typical DOS message "This program must be run under win32", after the DOS header because like i mentioned before, in a win32 environment, the windows executable loader only looks for two things in the DOS header (the MZ signature and the pointer to the PE header (This pointer is at offser 0x3c in the DOS header ) . Also note that we will zero out some of the fields in the image file header. Remember the DOS header is 64 bytes (0x40) long so therefore we will start with the PE signature here at offset 0x40.
In the hex editor, append 24 bytes of zeros to your file so we have the correct length in place for this structure that holds the PE signature and image file structure. Now at offset 0x40, overwrite the first 4 bytes with "50 45 00 00", which is the "PE" signature. At offset 0x44, write "4c 01". This here means that this program is intended to be ran on an intel i386 platform. The next two bytes are the number of sections. We are gonna use two sections, so write "02 00". The next 12 bytes are not important so just leave them zero'd out. At offset 0x54, enter "E0 00" and at offset 0x56, enter "03 01". Offset 0x54 is important and specifies how big the next structure beginning at offset 0x58 should be (this structure is the NT_OPTIONAL_HEADERS field). We derived this value by adding the size of the optional NT header which is 0x60 (96 bytes) and the size of the image data directories. Each entry in the data directories is 8 bytes long and we have up to 16 entries (this equates to 128 bytes). So 96 plus 128 bytes is 224 bytes (or 0xE0). Offset 0x56 is rather complicated. The values in this field can determine whether this file is a dll or executable, if a 32 bit machine is expected and so forth. Its best to observe this field in LordPE. I copied the values for this field in another executable "03 01".
 Since we specified in at offset 0x54 that the NT optional header was gonna be 224 bytes (0xE0) long, lets pad our file with 224 bytes as well. Remember, in our file, the NT optional header structure starts at offset 0x58.
At offset 0x58, enter bytes "0B 01". These two bytes tells windows that this is a PE32 file.
From offset 0x5A, the next 14 bytes are not important and can remain all zeros. This takes us to offset 0x68. This field is a dword (4 bytes) and takes an RVA (Relative Virtual Address). An RVA is an offset that is added to a base address. For example, if a base address is 0x00400000 and the RVA to a function named "OpenFile" is "2000", then this equates the function being located at 0x00402000. There are quite a few fields that contain an RVA, but just remember that an RVA is always an offset that is added to the base address (the base address will be defined shortly is the NT optional header) in order to find the location of that object in Virtual memory. RVA's never point to an offset in the executable file. Lets get back on track. At offset 0x68 we will write a dword for an RVA representing the AddressOfEntryPoint (address of entry point is where our program will begin executing code after it is loaded into memory). We write "00 10 00 00". The next 8 bytes are not important so leave them zero'd.
We are now at offset 0x74. This field is the image base that i refered to before as i was explaining RVAs. This field takes a dword and i will use " 00 00 40 00".
The next 8 bytes define the section alignment and the file alignment respectively. They are both dword values. We will keep them the same for simplicity, "00 10 00 00" and "00 10 00 00". It is hard to find the right words to explain section and file alignment, although the concept is quite simple, but i'll try. Imagine a executable file with three sections, each named A, B and C. Sections are like containers, each with a different purpose. Section A can contain the assembly code, section B can contain strings that the programmer hard coded (like passwords, error messages, message box strings, etc and section C can also contain other data. Its not hard to tell that these sections are treated differently, one can be interpreted as code, the others as data. Because of this, sections have attributes, like read, write, execute, etc. Section/file alignment aids the windows loader in identifying the boundaries of each section, so that it correctly knows which parts should be executable and which parts shouldn't. For instance, we have a base image that we defined earlier of 0x00400000. We can have a section alignment of 0x1000. What this means is that we can have a section located at 0x00401000. Lets say section A had 0x50 bytes of code in its section, because of section alignment value of 0x1000, the next section, section B, will reside at 0x00402000. What if section B had 0x15o0 bytes of data. Doing the math, since section B starts at 0x00402000 + 0x1500 0f data, we get 0x00403500. Because thing are alingned at blocks of 0x1000 bytes, section C will begin at 0x00404000. All the while we were talking about section alignment, we were referring to how things are aligned in memory. The file alingment represents how the sections are aligned in the file. For simplicity sake, i gave it the same value as with the section alignment.
We should now be at offset 0x80. The next 28 bytes define fields that are not important to us so leave them filled with zeros.
Update: Actually the definition at offset 0x88 (MajorSubsystemVersion), is a necessary field. This field is two bytes and i used "04 00". Another important field is the SizeOfHeaders field at offset 0x94. This is also an important field, and thankfully, lordpe can populate this field for us quite easily by the push of a button.
This brings us to offset 9c. This field takes a word (2 bytes) that define the subsystem (this indicates if this will be a console application or gui application, etc.). For console mode, we enter the values "03 00". The next 22 bytes can remain zero'd out. At offset 0xB4, this field represents (NumberOfRvaAndSizes) which indicates how many entries will be in the Data directory structure. I will be using the values "10 00 00 00" to indicate 0x10 which is 16 in decimal. This means the windows loader expects to find an array of 16 entries in the image data directory structure which follows next.
We should be at offset 0xB8 ready to initialize our data directory structure. Each entry consists of two dwords (8 bytes). The first list an RVA and the second is a size. We are only interested in adding an import table which is the second entry in the data directory structure. Therefore the first 8 bytes will be zero's, the next 4 will contain the RVA for the import table and the next 4 will define the size of the import table (our import entry RVA will be "00 20 00 00" and we will set the size to "00 10 00 00" ). The remaining 112 bytes represent the rest of the data directory structure and will remain zero'd out. We should now have a hexdump that looks like this.
 Next we're onto the final stage of defining our PE header. This will include the section header definitions, If you recall earlier, we defined our NumberOfSection's field in the file header section as "02 00", so therefore, we are expected to define two sections in the section header. Each section is 40 bytes so lets go ahead and add 80 bytes to our file. Again not all fields in this structure are important to us so some will remain zero'd out.
We are currently at offset 0x138 where we will begin our section header definitions. The first 8 bytes are reserved for the section header name. Following good practice, we will make sure we dont use over 7 bytes, just so that our string is null terminated. We will call our first section "code" and append the remaining 8 bytes like so "63 6F 64 65 00 00 00 00". The next 4 bytes is the virtual size definition, and we will set it "00 10 00 00". The next 4 bytes is the RVA for this "code" section. We will use "00 10 00 00". Remember, RVAs get added to the base address, which in our case is 0x00400000, which will result in 0x00401000 being the location in memory where this code "section" will be found. So based on our definition so far, the virtual address for the "code" section is 0x00401000 and its size is 0x1000 (0x00401000 + 0x1000 = 0x00402000). In reality this section can be any size, but due to our definition in the section alignment field (defined in the NT optional header), the sections will always be aligned in blocks of 0x1000. Therefore our second section will begin at 0x00402000 because our section size is less than 0x1000.
Ok, the next 4 bytes define the size of the raw data (data on disk or in the file, not virtual size). Lets give it "00 10 00 00". The next 4 bytes indicate the offset to this section in the file (not in memory). Lets give it "00 10 00 00". The next 12 bytes will be left with zeros. Now the last 4 bytes of our first section header definition indicates the attributes this section should have, like read, write, execute, etc. This field is quite complex and you can use LordPE to help obtain the value you need. Open up another exe in lordpe and observe the section characteristics each section of that executable posses. LordPE will give you the 4 bytes that represent the resulting characteristics of that section. You can simply copy this to your exe.
Do the same for the second section header definition, but note that the RVAs and size of raw data definitions will be different. This is what your hexdump should look like at this point after adding the second section header definition.

LordPe should be able to parse your file now so open it up. LordPE can help point out your mistakes, and allow you to potentially correct them from in there.
 You will notice that the size of image is now 0x3000 in LordPE, even though we didn't define it. Thanks to LordPE, it was able to parse the headers and determine what the image size should be. LordPE can also calculate the SizeOfHeaders field and the checksum field automatically for us (in my tests, the checksum field was not necessary and could be left all zero'd).
We have completed defining our PE headers, but we are not finished with the exe. With our two section definitions, we definied some fields, size of raw data and a pointer to raw data. According to our definitions, we should have a text and data section of size 0x1000 (4096 bytes). The text section has a pointer to raw data at file (not virtual) offset 0x1000, while the data section has a file offset of 0x2000. This means that when windows attempts to parse the file it will look at our section header definition and see that the sections are pointing to offsets that dont exist, at least at this point (our file size is not even half of 0x1000 at this point). We will need to pad our file with bytes in accordance to what we indicated in the section headers. Since our last section is the data section, and its size was indicated to be 0x1000, our total file size should be the pointer to raw data of the "data" section + size of raw data for the "data" section as well (0x2000 + 0x1000 = 0x3000). Lets fill or pad our file with zero's till our file size is 0x3000.
IMPORTANT: I cannot stress enough how important it is that you get this file size right. If your file was 0x3001 bytes in size or 0x2FFF (basically if its not exactly 0x3000)and you try to run your file, windows will give you an error saying that the file is not a proper exe file. Basically windows parsed the headers and found a discrepancy between what the header says the file size should be and what it actually is on disk.
 So far, we should have a good executable that windows will be able to accept and parse. However, this program has no code and will crash. If you open up this file in a debugger like ollydbg, it will open up successfully (if you made a mistake following the steps before, ollydbg would not be able to open the file).
You will be dropped to the address of entry point (remeber the rva was 0x1000, therefore the base address 0x00400000 + 0x1000 = 0x00401000). This is essentially the "code" section that we defined earlier. Windows is expecting to execute code here but initially, all that is there is a bunch of zero's. Therefore the program crashes. We will need to write meaningful code here. The simplest program i can think of as of this writing was to write code that simply exits. This wouldn't do anything of significance but at least our program will no longer crash as the ExitProcess kernel32 api will cause our program to exit gracefully. To get this functionality, two more things need to be done.
1. We need to define an image import structure for our kernel32.dll. This will have a pointer to another pointer that will point to the "ExitProcess" api found within kernel32.dll.
2. We will need to write code that will simply call the function. Generating the relevant code can be made simple by using a debugger like olly. Here are the bytes that i used at offset 0x1000, i.e, the "code" section and also the AddressOfEntrypoint RVA. "FF 15 70 20 40 00". You can see screen shots of how i set up offset 0x1000 and 0x2000 in my file.


Congratulations !!!. At this point, you should have a working PE executable file that simply just exits. If you wanted more functionality, you would need to import DLLs. Therefore, you would need to make sure that each dll has an entry in the image import descriptor structure (in our example, we only had one for kernel32.dll) and then the functions that these dlls provide must be defined like we did with "ExitProcess" (Note that function names ARE case sensitive). The rest is dependent on your assembly skills, to manipulate the registers and setup the stack for the relevant functions calls to make a reasonable program.
I hope this was helpful to some and would be used as a reference for researchers. I recommend reading the following references below as they've provided me with all the necessary information that i need to succeed at this binary hackery.
Resources / Good Reading:
Hxd hex editor
Tiny Pe project
Pentest.cryptocity.net PE format PDF
LordPE
Microsoft PE Header structure definitions
Monday, December 5, 2011
Helpful log parsing tips
Most programs and services produce logs. When a user visits an apache web server, the service will most likely keep a log of that request, along with the date and requester's ip address. Other details might be logged as well. Here us an example of some entries in a logfile:
192.168.1.20 - - [21/Sep/2011:11:04:40 +1000] "GET / HTTP/1.0" 200 468
192.168.1.20 - - [21/Sep/2011:11:07:48 +1000] "GET /login.php HTTP/1.0" 200 6433
Log files would usually contain hundreds of such entries, most, if not all of which are important to us. If there is an issue with a service, perhaps there is an entry in the logfile that can tell us why. Another scenario is where management require some statistical information. For example, how many unique IP addresses visited their website in the past hour and what pages did they visit. Or which web pages are the most frequently visited.
If you look around on the web, you will be able to find tools that would retrieve most of this information for you. However, some of these tools may not have the functionality built in to retrieve all the data you require. Hence, knowing how to do things yourself might come in handy.
Here are some examples. I used the following log entries in my examples.
192.168.1.20 - - [21/Sep/2011:11:04:40 -0500] "GET / HTTP/1.0" 200 6443
192.168.1.25 - - [21/Sep/2011:11:07:48 -0500] "GET /logo.gif HTTP/1.0" 200 4006
192.168.1.22 - - [21/Sep/2011:11:08:40 -0500] "GET /forum.php HTTP/1.0" 200 468
192.168.1.20 - - [21/Sep/2011:11:08:48 -0500] "GET /sports.php HTTP/1.0" 200 98002
192.168.1.22 - - [21/Sep/2011:11:09:42 -0500] "GET /basketball.htm HTTP/1.0" 200 45869
192.168.1.22 - - [21/Sep/2011:11:09:48 -0500] "POST /login.php HTTP/1.0" 404 501
192.168.1.25 - - [21/Sep/2011:11:09:50 -0500] "POST /login.php HTTP/1.0" 404 501
192.168.1.20 - - [21/Sep/2011:11:09:55 -0500] "GET / HTTP/1.0" 200 6433
We can parse the unique IP addresses that visited our apache website. We can take this step further and sort these IP address by the one with the most requests. This will give you an idea of which IP address chatted the most with the server and which ones were least talkative.
awk '{print $1}' access.log | sort | uniq -c | sort -nr
We can generate statistics based on HTTP status codes. From there, you can see how many successful requests were made, as well as how many bad requests were made for non-existent pages or files. Based on our example log entries above, we should get 6 successful requests and 2 "file not found" requests.
awk '{print $9}' access.log| sort | uniq -c | sort -rn
To see only the log entries that genereated the HTTP status code of 404 or "file not found" requests.
awk '$9 == "404"' access.log
Continuing from the last example, if we only wanted to see the IP address and the request that was made that triggered the 404 status code:
awk '$9 == "404"{print $1, $7}'
Lets take the last example a little further. Say management wanted to know the number of requests that resulted in a "404" status code between 11 AM to 12 PM on 21/Sep/2011.
awk '$9 == "404"' access.log | egrep "21\/Sep\/2011" | awk 'substr($4,14,2) == "11"'
Lastly, if you want to check how many bytes your server has served up for a particular day, awk and grep can help us agian. The number after the status code in the log entries is the size (in bytes) of the object returned to the client from the request.
In my example, I omit the entries with status code "304". I do this because an intelligent user agent (browser) may already have the object in its cache. A 304 indicates that the cached version has the same timestamp as the 'live' version of the file so they don't need to download it. If the 'live' file was newer then the response would instead be a 200.
egrep "21\/Sep\/2011" | access.log | awk '$9 != "304"{sum+=$10}END{print sum}'The result of this is in bytes. To convert to kilobytes and or megabytes, the print statement at the end would be {print sum/1024/1024}.
Its important to know that these techniques are not limited to only apache log files. Any log file can be parsed using the combination of grep, awk, sort, uniq and even sed (sed can be used to clean up the output). Under linux systems, the log files at /var/log can be parsed in a similar fashion with slight modifications to the parameters passed to the programs. If you wanna get fancy, you can output the data to a text file and run a php script that reads this file and outputs a nicely formatted HTML report page.
Resources / Good Reading:
www.the-art-of-web.com
status codes
192.168.1.20 - - [21/Sep/2011:11:04:40 +1000] "GET / HTTP/1.0" 200 468
192.168.1.20 - - [21/Sep/2011:11:07:48 +1000] "GET /login.php HTTP/1.0" 200 6433
Log files would usually contain hundreds of such entries, most, if not all of which are important to us. If there is an issue with a service, perhaps there is an entry in the logfile that can tell us why. Another scenario is where management require some statistical information. For example, how many unique IP addresses visited their website in the past hour and what pages did they visit. Or which web pages are the most frequently visited.
If you look around on the web, you will be able to find tools that would retrieve most of this information for you. However, some of these tools may not have the functionality built in to retrieve all the data you require. Hence, knowing how to do things yourself might come in handy.
Here are some examples. I used the following log entries in my examples.
192.168.1.20 - - [21/Sep/2011:11:04:40 -0500] "GET / HTTP/1.0" 200 6443
192.168.1.25 - - [21/Sep/2011:11:07:48 -0500] "GET /logo.gif HTTP/1.0" 200 4006
192.168.1.22 - - [21/Sep/2011:11:08:40 -0500] "GET /forum.php HTTP/1.0" 200 468
192.168.1.20 - - [21/Sep/2011:11:08:48 -0500] "GET /sports.php HTTP/1.0" 200 98002
192.168.1.22 - - [21/Sep/2011:11:09:42 -0500] "GET /basketball.htm HTTP/1.0" 200 45869
192.168.1.22 - - [21/Sep/2011:11:09:48 -0500] "POST /login.php HTTP/1.0" 404 501
192.168.1.25 - - [21/Sep/2011:11:09:50 -0500] "POST /login.php HTTP/1.0" 404 501
192.168.1.20 - - [21/Sep/2011:11:09:55 -0500] "GET / HTTP/1.0" 200 6433
We can parse the unique IP addresses that visited our apache website. We can take this step further and sort these IP address by the one with the most requests. This will give you an idea of which IP address chatted the most with the server and which ones were least talkative.
awk '{print $1}' access.log | sort | uniq -c | sort -nr
We can generate statistics based on HTTP status codes. From there, you can see how many successful requests were made, as well as how many bad requests were made for non-existent pages or files. Based on our example log entries above, we should get 6 successful requests and 2 "file not found" requests.
awk '{print $9}' access.log| sort | uniq -c | sort -rn
To see only the log entries that genereated the HTTP status code of 404 or "file not found" requests.
awk '$9 == "404"' access.log
Continuing from the last example, if we only wanted to see the IP address and the request that was made that triggered the 404 status code:
awk '$9 == "404"{print $1, $7}'
Lets take the last example a little further. Say management wanted to know the number of requests that resulted in a "404" status code between 11 AM to 12 PM on 21/Sep/2011.
awk '$9 == "404"' access.log | egrep "21\/Sep\/2011" | awk 'substr($4,14,2) == "11"'
Lastly, if you want to check how many bytes your server has served up for a particular day, awk and grep can help us agian. The number after the status code in the log entries is the size (in bytes) of the object returned to the client from the request.
In my example, I omit the entries with status code "304". I do this because an intelligent user agent (browser) may already have the object in its cache. A 304 indicates that the cached version has the same timestamp as the 'live' version of the file so they don't need to download it. If the 'live' file was newer then the response would instead be a 200.
egrep "21\/Sep\/2011" | access.log | awk '$9 != "304"{sum+=$10}END{print sum}'The result of this is in bytes. To convert to kilobytes and or megabytes, the print statement at the end would be {print sum/1024/1024}.
Its important to know that these techniques are not limited to only apache log files. Any log file can be parsed using the combination of grep, awk, sort, uniq and even sed (sed can be used to clean up the output). Under linux systems, the log files at /var/log can be parsed in a similar fashion with slight modifications to the parameters passed to the programs. If you wanna get fancy, you can output the data to a text file and run a php script that reads this file and outputs a nicely formatted HTML report page.
Resources / Good Reading:
www.the-art-of-web.com
status codes
Wednesday, November 9, 2011
Snort gets a little help from swatch
Wanna know who is attacking your network and be notified ASAP? Maybe this setup might help you. Snort is a well developed open source IDS/IPS (intrusion detection/prevention system). An IDS is basically a sniffer (like tcpdump, wireshark, etc.) that looks at all the packets on the network and keeps an eye out for only interesting information. When it sees information that might be of interest (like a tcp port scan), it will log the packets pertaining to the port scan. An IDS will only log these packets, but doesn't take the extra steps to prevent the network attack from happening. An IPS will take the role of the IDS one step farther and has the ability to perform other actions in addition to logging. These might include blocking ports, setting firewall rules to block traffic based on port or ip address, etc.
Lets start using snort.
Snort can be used as a regular sniffer, like tcpdump. See the commands below:
# snort -dev -i eth0
To log the packets to a file, use the -l switch and specify a directory. Snort will create the file for you.
# snort -dev -i eth0 -l /root/snort/
Depending on your defaults, snort may log in Ascii mode or pcap mode. You can use the -K switch to specify (ascii, pcap or none).
# snort -K Ascii -dev -i eth0 -l /root/snort
To log packets in tcpdump format you can use the -b only.
# snort -b -dev -i eth0 -l /root/snort
Using snort as an IDS
This is accomplished by specifying a config file on the command line.
# snort -c snort.conf -i eth0
I always like to use -A for alert mode. Basically a file gets created called alerts, and when bad traffic is seen on the network, snort will make a note of it in this alert file. There are a few options for these, but i like using the fast option (see man snort for more details). Note that two files are created, the alert file and the snort.log file. The alert file will contain syslog like log entires when an attach happens and the snort log file will contain the bad traffic data(in tcpdump format if thats the option you went with) that triggered the alerts.
# snort -A fast -c snort.conf -i eth0
The snort.conf file is well doucmented and easy to configue. Here is a very barebones config file example.
var HOME_NET any
var EXTERNAL_NET any
var DNS_SERVERS $HOME_NET
var SMTP_SERVERS $HOME_NET
var HTTP_SERVERS $HOME_NET
var SQL_SERVERS $HOME_NET
var TELNET_SERVERS $HOME_NET
var HTTP_PORTS 80
var SHELLCODE_PORTS !80
var ORACLE_PORTS 1521
var AIM_SERVERS [64.12.24.0/24,64.12.25.0/24,64.12.26.14/24,64.12.28.0/24,64.12.29.0/24,64.12.161.0/24,64.12.163.0/24,205.188.5.0/24,205.188.9.0/24]
var RULE_PATH $IDS_BASE/rules
include /etc/snort/classification.config
include $RULE_PATH/icmp.rules
The above example snort.conf will look for bad icmp traffic. If you ping your loopback interface, snort will generate some alerts and start logging this traffic.
How swatch can help you.
I blogged about swatch already so you can refer to my posting on that. Swatch can be used to monitor a snort alert file and be configured to send an email to you when a specific alert gets triggered. See the video below for a demonstration.
Resources/Good Reading:
snort.org
pauldotcom.com
Lets start using snort.
Snort can be used as a regular sniffer, like tcpdump. See the commands below:
# snort -dev -i eth0
To log the packets to a file, use the -l switch and specify a directory. Snort will create the file for you.
# snort -dev -i eth0 -l /root/snort/
Depending on your defaults, snort may log in Ascii mode or pcap mode. You can use the -K switch to specify (ascii, pcap or none).
# snort -K Ascii -dev -i eth0 -l /root/snort
To log packets in tcpdump format you can use the -b only.
# snort -b -dev -i eth0 -l /root/snort
Using snort as an IDS
This is accomplished by specifying a config file on the command line.
# snort -c snort.conf -i eth0
I always like to use -A for alert mode. Basically a file gets created called alerts, and when bad traffic is seen on the network, snort will make a note of it in this alert file. There are a few options for these, but i like using the fast option (see man snort for more details). Note that two files are created, the alert file and the snort.log file. The alert file will contain syslog like log entires when an attach happens and the snort log file will contain the bad traffic data(in tcpdump format if thats the option you went with) that triggered the alerts.
# snort -A fast -c snort.conf -i eth0
The snort.conf file is well doucmented and easy to configue. Here is a very barebones config file example.
var HOME_NET any
var EXTERNAL_NET any
var DNS_SERVERS $HOME_NET
var SMTP_SERVERS $HOME_NET
var HTTP_SERVERS $HOME_NET
var SQL_SERVERS $HOME_NET
var TELNET_SERVERS $HOME_NET
var HTTP_PORTS 80
var SHELLCODE_PORTS !80
var ORACLE_PORTS 1521
var AIM_SERVERS [64.12.24.0/24,64.12.25.0/24,64.12.26.14/24,64.12.28.0/24,64.12.29.0/24,64.12.161.0/24,64.12.163.0/24,205.188.5.0/24,205.188.9.0/24]
var RULE_PATH $IDS_BASE/rules
include /etc/snort/classification.config
include $RULE_PATH/icmp.rules
The above example snort.conf will look for bad icmp traffic. If you ping your loopback interface, snort will generate some alerts and start logging this traffic.
How swatch can help you.
I blogged about swatch already so you can refer to my posting on that. Swatch can be used to monitor a snort alert file and be configured to send an email to you when a specific alert gets triggered. See the video below for a demonstration.
combining snort and swatch from aerokid240 on Vimeo.
One issue that will arise is that you may start recieving multiple emails. For example, if 4 ping packets were sent from the loopback address, then 4 alerts should be triggered by snort. Therefore, when swatch is notified about these alerts, 4 emails would be sent instead of just one. So if snort sets the same alert 100 times, you can expect 100 emails in this setup. I'm sure you can set swatch to run a script that would overcome this problem, but that is beyond what i wanted to demonstrate in this post.Resources/Good Reading:
snort.org
pauldotcom.com
Tuesday, November 8, 2011
Uncloaking the unprotected with DirBuster
The following two paragraphs were taken from owasp.com on DirBuster.
DirBuster is a multi threaded java application designed to brute force directories and files names on web/application servers. Often is the case now of what looks like a web server in a state of default installation is actually not, and has pages and applications hidden within. DirBuster attempts to find these.
Resources / Good Reading:
owasp.com
DirBuster is a multi threaded java application designed to brute force directories and files names on web/application servers. Often is the case now of what looks like a web server in a state of default installation is actually not, and has pages and applications hidden within. DirBuster attempts to find these.
However tools of this nature are often as only good as the directory and file list they come with. A different approach was taken to generating this. The list was generated from scratch, by crawling the Internet and collecting the directory and files that are actually used by developers! DirBuster comes a total of 9 different lists (Further information can be found below), this makes DirBuster extremely effective at finding those hidden files and directories. And if that was not enough DirBuster also has the option to perform a pure brute force, which leaves the hidden directories and files nowhere to hide! If you have the time ;)
Here is a video that i've created illustrating one of the ways DirBuster can be used and why its very important to take the necessary steps to secure your data, rather than just hiding it. Because the webmaster didn't properly configure his webserver for security, it was possible to gain access to some data.Dirbuster from aerokid240 on Vimeo.
Resources / Good Reading:
owasp.com
Saturday, November 5, 2011
Brute forcing html login forms
Lately, i been really busy at work and havent researched or read any books in the past two weeks. Already i felt like my brain was slipping away. So i decided to fire up a DVL (Damn Vulnerable linux), which is a live distribution that has many vulnerabilities for one to practice their security skills. I haven't used it before so i didn't know what i was getting into. I did a port scan and found two open ports (631 and 3306/mysql). Initially, i tried to identify the MySQL version using metasploit but that didn't work. I then tried using the metasploit mysql bruteforcer, to do a dictionary attack on the service, but metasploit complained that the attack will only work on older versions of MySQL. I was clueless. I began looking around the DVL and then started apache (isn't running by default) from the desktop shortcuts. I went back to my attacking backtrack 5 machine and fired up Firefox then went to the relevant webpage URL for the DVL machine. Interesting enough, it gave me a directory listing. I saw phpmyadmin listed so i decided to go in their. I was presented with the login page. I tried some random stuff i thought might work and had no success. I was failing miserably. What i needed to do at that point was automate the password guessing process. This is where hydra comes in.
This is the code i used.
# hydra -l admin -P passwords.lst -e ns -vV 192.168.2.10 http-post-form "/phpmyadmin/index.php:pma_username=^USER^&pma_password=^PASS^&server=1:denied"
After a few minutes, i had a smile on my face. Hydra found two usable passwords for the username admin. Just to avoid any spoilers, i wouldn't post the relevant passwords. Out of curiosuty, i decided to run hydra again for the user root.
# hydra -l root -P passwords.lst -f -e ns -vV 192.168.2.10 http-post-form "/phpmyadmin/index.php:pma_username=^USER^&pma_password=^PASS^&server=1:denied"
I decided to use the "-f" switch so hydra would quit immediately when a matching password is found. Indeed, after a few seconds, i had a usable password. In reality, there is nothing to fancy about this as the accounts and their passwords seem to be at their defaults and if you knew what mysql accounts default credentials are, then you know that bruteforcing here was a dead waste of time :). Either way, i had a foot in the door and the point of this was to demonstrate how you can bruteforce html login forms with hydra.
BTW, adding the "-U" switch would give you usage information when using the "http-post-form" service.
Update: It turns out that you can use any username with the password of "0" for some reason :). Now that you have access, to the mysql database, you can snoop around to get information and user logins for web apps like wordpress and joomla.
Resources/Good Reading:
OWASP.org
This is the code i used.
# hydra -l admin -P passwords.lst -e ns -vV 192.168.2.10 http-post-form "/phpmyadmin/index.php:pma_username=^USER^&pma_password=^PASS^&server=1:denied"
After a few minutes, i had a smile on my face. Hydra found two usable passwords for the username admin. Just to avoid any spoilers, i wouldn't post the relevant passwords. Out of curiosuty, i decided to run hydra again for the user root.
# hydra -l root -P passwords.lst -f -e ns -vV 192.168.2.10 http-post-form "/phpmyadmin/index.php:pma_username=^USER^&pma_password=^PASS^&server=1:denied"
I decided to use the "-f" switch so hydra would quit immediately when a matching password is found. Indeed, after a few seconds, i had a usable password. In reality, there is nothing to fancy about this as the accounts and their passwords seem to be at their defaults and if you knew what mysql accounts default credentials are, then you know that bruteforcing here was a dead waste of time :). Either way, i had a foot in the door and the point of this was to demonstrate how you can bruteforce html login forms with hydra.
BTW, adding the "-U" switch would give you usage information when using the "http-post-form" service.
Update: It turns out that you can use any username with the password of "0" for some reason :). Now that you have access, to the mysql database, you can snoop around to get information and user logins for web apps like wordpress and joomla.
Resources/Good Reading:
OWASP.org
Monday, September 19, 2011
Mail Serving with Postfix and dovecot
There are tons of great documentation out there showing you how to set this SMTP server up. Postfix is very popular and a great alternative to the even more popular sendmail. Here are some good resources that i used to learn how to set this up:
Ubuntu postifx documenation
Postfix virtual mailbox setup
Centos postfix setup
Centos postfix restrictions
Setting up dovecot is simple enough. Check out the following resources:
Ubuntu dovecot configuration
wiki.Dovecot.org virtual users
wiki.Dovecot.org virtual users example
wiki.dovecot.org authentication/password schemes
Integrating dovecot SASL with postfix
wiki.dovecot.org cram-md5 howto
Postifx/dovecot mail system can make use of actual system users or virtual users. With system users, you would have to create a new system users (eg, adduser mark) for each user. I don't really want to have to create a new system user everytime to add a new mail user. Using virtual users with virtual mailboxes suites my installations better (more personal preference). The key thing to remember is that you would have to make changes to both postfix and dovecot configutations to get this to work. In postfix, the key settings that need to be modified can be seen here. In dovecot, this example will show you how to setup the virtual user accounts for SASL login authentication.
Ubuntu postifx documenation
Postfix virtual mailbox setup
Centos postfix setup
Centos postfix restrictions
Setting up dovecot is simple enough. Check out the following resources:
Ubuntu dovecot configuration
wiki.Dovecot.org virtual users
wiki.Dovecot.org virtual users example
wiki.dovecot.org authentication/password schemes
Integrating dovecot SASL with postfix
wiki.dovecot.org cram-md5 howto
Postifx/dovecot mail system can make use of actual system users or virtual users. With system users, you would have to create a new system users (eg, adduser mark) for each user. I don't really want to have to create a new system user everytime to add a new mail user. Using virtual users with virtual mailboxes suites my installations better (more personal preference). The key thing to remember is that you would have to make changes to both postfix and dovecot configutations to get this to work. In postfix, the key settings that need to be modified can be seen here. In dovecot, this example will show you how to setup the virtual user accounts for SASL login authentication.
Subscribe to:
Posts (Atom)