Scenario:
How do you manage the configuration and management of multiple servers (25 plus nodes) in an effective manner?. Say we want to setup the ssh service on 20 servers, configure the service to meet our needs, then reload the service for the changes to take effect. This would involve you doing this manually for each system (can't be done remotely with ssh cause its not installed yet ).What if it was for another service like an ftp server. You can configure one server then scp the config file(s) to each of the 20 machines, then issue the commands to restart the service for the changes to take effect. OK that works, but its only 20 machines. This clearly doesn't scale up very well when you need to mange hundreds of systems. Clearly there must be a better way. My solution to such a problem is puppet.
Puppet is an open source configuration management written in ruby. It allows you to automate many task across many unix-like systems (windows integration is still in the works) including the installation of packages, configuration of services, creation of users, execution of bash commands and more. It is based on a client-server model. The server (which is called the puppetmaster) will contain the definitions that essentially determines the end state or how things should be on the nodes, for example: what services should be installed, what config files should be downloaded to these nodes, etc. The client (callet the puppet) will poll the server every 30 minutes by default, for these "state" definitions and process them. The client will compare its state with these definitions, and make the necessary corrections where necessary.
I came across some useful tutorials and resources that will get you up on running quickly. The configuration syntax does take some getting used to but if you are like me, you can adapt quite easily after looking at some examples.
Resources / Good reading:
http://puppetlabs.com
http://en.wikipedia.org/wiki/Puppet_(software)
www.linuxjournal.com
http://bitfieldconsulting.com/puppet-tutorial
http://www.debian-administration.org/articles/526
Thursday, November 8, 2012
Monday, October 8, 2012
Protecting your services with fail2ban
There is no one solution that takes care of your network security. Protecting your services from the bad guys is quite complex and involved. Lets say we wanted to protect our openssh service for example; there are quite a few things that can be done in order to improve its security.
The first thing you would want to do is ensure that you have the latest version of openssh. You should also setup a mechanism that will check for updates regularly. Next is configuration. Server software can be quite complex to configure securly and openssh is no exception. Once your configs are all polished, there is still one attack vector that still could impact us, bruteforce attacks. Unfortunately, openssh doesn't have a feature that we can configure or enable that prevents bruteforce attacks. However there is a project, fail2ban, that can protect us from such attacks.
Fail2ban has been around for almost 5 years and simply works. It works by monitoring log files (in openssh's case, the auth.log file found on debian bases systems in /var/log/) for signs of failed login attempts. When it detects a number of failed attempts for a given duration of time, it can block the offending IP address using iptables and also send an email to the system admin. Fail2ban doesn't just work for openssh but can be configured to work for any service that logs fail logging attempts. See the links below for examples and details for configuring fail2ban for your services.
Resources / Good reading:
fail2ban.org
https://help.ubuntu.com/community/Fail2ban
http://www.howtoforge.com/fail2ban_debian_etch
http://www.the-art-of-web.com/system/fail2ban/
Monday, August 13, 2012
Raid and High-Availability linux solutions
I've been doing a lot of research lately on Linux solutions on Raid for custom/home built NAS solutions, and high availabilty for networked services. As usual, Linux has some of the best solutions on everything. In my research, i was able to test different solutions and technologies; btrfs, mdadm with LVM, glusterFS, drbd and heartbeat. I won't be exlpaining how to get up and running with these systems but will leave some of the references that i used to get up and going. In the end, i learned alot about raid in general and found mdadm with LVM to be the best solution for me. Btrfs was excellent in my tests but is still somewhat experimental and lack raid 5 support currently :(. Lets briefly get acquainted with these individual software systems.
Btrfs is an advanced filesystem that enables you to aggregate disks and partitions into usable raid arrays that can be quickly and easily mounted. The filesystem is capable of error detection and correction through check sums, snapshots and sub volume management for volume/storage management (as with LVM). As of today, btrfs is still in development and not considered fully stable. Here are some references to get you up and running. Link1, Link2.
Drbd is a mirroring technology that has the ability to sync two disks or partitions from two distinct machines. This is useful for setting up a backup/secondary server that should each have identical data. This is essentially raid 1 over IP. Here are some resources. Link1, Link2
Heartbeat is a high-availability solution that allows for system fail-over. What this means is that heartbeat will provide access to the resources on machine A and in the event that machine A goes down, it will notify machine B to wake up and take over the duties of machine A. This transfer of resources is seamless in most cases and there may be only a 2-6 seconds downtime depending on how things are configured. Here are some resources. Link1, Link2
GlusterFS is a rather unique filesystem that enables a network of machines to combine there storage resources (disks, partitions, folders) and add raid like capabilities with these storage devices. This is similar to drbd, however, i find it to be more flexible. While drbd operates at a lower level (block level), glusterFS is at the filesystem level and operates on the files. You can mirror folders to multiple peer machines (raid 1 over the network), stripe data (raid 0 over the network), combine the storage capacities of all peers and more. Resources: Link1, Link2
Mdadm is the traditional Linux software raid solution. Its been tried and tested and is still the goto solution amongst linux sys-admins. It has support for many raid types including, raid-0, raid-1, raid-5, raid-10 and more. It is common to use LVM for volume management on top of the mdadm raid solution. LVM allows for control and management of the storage pool, which makes it easy to grow or shrink volumes (which are like partitions on a hard drive), take snapshots, etc. Although I loved using btrfs, as it works great for a raid solution, it did lack raid 5 support at the time (mdadm has raid-5 support. Support for raid-5 is due out in a later kernel release for btrf). I found the combination of mdadm and lvm more involved in its setup than btrfs but still relatively easy. I spent quite sometime simulating failed disks in both raid 1 and 5. I was playing a video from the local system when i simulated a disk failure on one of the disks. While replacing the failed disk (still, we are simulating) and rebuilding the array, the video kept on playing with no lag/downtime.
Mdadm Resources: Link1, Link2, Link3
LVM resources: Link1, Link2, Link3
Tuesday, July 24, 2012
System Monitoring for home users.
I recently covered a system monitoring tool called icinga. Its features and capabilities are very powerful but may be overkill for a home network. In this post, i will show an alternate setup which will allow you to pull system information from networked linux machines and send then back to a central server.
Here is an overview of the pieces that make this work. We will connect to client machines over ssh, execute a local script that will retrieve system information and then send this information back to us on a custom port using netcat. I would also use a utility called expect to aid in automating everything. You can find out much more about expect from google or watch this excellent tutorial on hak5.
The script file will need to be copied to each client machine. Here are the contents of the script. Give this script file executable permissions with the chmod command. Its a modified version from this:
Filename would be sysstat.sh
#!/bin/bash
CPUTIME=$(ps -eo pcpu | awk 'NR>1' | awk '{tot=tot+$1} END {print tot}')
CPUCORES=$(cat /proc/cpuinfo | grep -c processor)
echo "
System Summary (collected on `date`)
- CPU Cores = `echo $CPUCORES`
- CPU Usage (average) = `echo $CPUTIME / $CPUCORES | bc`%
- Memory free (real) = `free -m | head -n 2 | tail -n 1 | awk {'print $4'}` Mb
- Memory free (cache) = `free -m | head -n 3 | tail -n 1 | awk {'print $3'}` Mb
- Swap in use = `free -m | tail -n 1 | awk {'print $3'}` Mb
- System Uptime = `uptime`
- Local IPs = `ifconfig | grep -B1 "inet addr" | awk '$1 == "inet"{ print $2}'|awk -F: '{print $2}' |grep -v "127.0.0.1"
`
- Public IP = `dig +short myip.opendns.com @resolver1.opendns.com`
- Disk Space Used = `df -h|awk '$6 ~ /\/$/ {print $1 ": percentage used: " $5 " out of " $2 " total on " $6}'
`
################################################################
"
The expect script file's contents are as below. Give this file executable permissions afterwords with chmod:
Filename would be ssh.exp
#!/usr/bin/expect
spawn ssh root@127.0.0.1
expect "?assword"
send "test\n"
expect "root@"
send "sleep 5\n"
expect "root@"
send "./sysstat.sh|nc -q 1 127.0.0.1 4444\n"
expect "root@"
send "echo $?\n"
expect {
"0" {send "echo 'Success !!!' \n"}
"1" {send "echo 'Something went wrong !!!' \n"}
}
send "exit\n"
interact
We will setup a netcat listener on our machine that will receive the client system information. I used ncat, a similar utility to netcat but has the -k option that will allow us to accept multiple connections instead of one.
ncat -klvp 1234
Now, with the ncat program listening for connections, we only need to run the expect script file. This script will initiate an ssh connection with the remote client system, logs you in with the proper password, sleeps for 5 seconds , execute the sysstat.sh shell script we created, which will gather information about the system (like CPU load, RAM usage, Hard disk space, etc) and output the results to netcat. Netcat will then send this information to our ncat listener. The expect script then exits the ssh session and finishes.
Here is a sample of the output you can expect from our ncat listener|:
System Summary (collected on Tue Jul 24 18:43:53 EDT 2012)Resources / Good reading:
- CPU Cores = 2
- CPU Usage (average) = 17%
- Memory free (real) = 477 Mb
- Memory free (cache) = 221 Mb
- Swap in use = 0 Mb
- System Uptime = 18:43:53 up 43 min, 4 users, load average: 0.07, 0.09, 0.12
- Local IPs = 192.168.2.15
- Public IP = 123.45.678.90
- Disk Space Used = /dev/sda5: percentage used: 41% out of 39G total on $6
################################################################
question-defense.com
hak5.org: expect tutorial
thegeekstuff.com
Linux admin tip : "Detecting root account logins"
Just wanted to share this tip that i found very simple, yet elegant. This tip is useful in a scenario where you would like to be notified/warned instantly (via email in this example) when someone logs in to the root account. This can be modified to monitor any account, but since root is a juicy target for hackers, we will use it for this example.
Sometimes the easy solution is the best and a lot of the time you just want a solution that gets the job done. There are multiple ways to accomplish this task but i like the simplicity of this one and ease of its setup. Essentially, we will be adding a line of code to the .bash_profile file in root's home directory (/root/) that will simply construct and send an email to your email account, notifying you that someone has logged into the root account. The .bash_profile file is a script file that gets executed for a particular user when someone logs in via ssh or locally on a terminal. Simple enough right?
Lets start:
In a text editor, open up the .bash_profile hidden file found in root's home directory and add this to the bottom of the file.
It's well known that you should resist logging into the root account for performing day to day tasks. You should have an already created user with the relevant privileges to perform all necessary admin tasks. But lets say you frequently have to log into the root account for whatever reason. As you can imagine, when you log in as root legitimately, this will send an email each time to the specified account and hence adds more weight to your already obese inbox. Here is one solution.
Replace the code we wrote before in the .bash_profile file with this:
To remove the task:
that you can quickly execute when necessary.
Resources/Good Reading:
unixmen.com: Best practices to secure your server
at command
Sometimes the easy solution is the best and a lot of the time you just want a solution that gets the job done. There are multiple ways to accomplish this task but i like the simplicity of this one and ease of its setup. Essentially, we will be adding a line of code to the .bash_profile file in root's home directory (/root/) that will simply construct and send an email to your email account, notifying you that someone has logged into the root account. The .bash_profile file is a script file that gets executed for a particular user when someone logs in via ssh or locally on a terminal. Simple enough right?
Lets start:
In a text editor, open up the .bash_profile hidden file found in root's home directory and add this to the bottom of the file.
who | mail -s "Someone logged in as root" your@email.comSave the file then exit. To test this out, simply log out or reboot your computer. Of course for this to work, you would need an active internet connection, a mail client and an smtp server. In my case, for the smtp server, i had postfix installed. An alternative method to send the email will be essentially the same method i used in the swatch blog post using the sendemail program. This method would involve you leaving your hard coded password for your email account in the .bash_profile file which is rather in-secure but nonetheless, a method that will work.
It's well known that you should resist logging into the root account for performing day to day tasks. You should have an already created user with the relevant privileges to perform all necessary admin tasks. But lets say you frequently have to log into the root account for whatever reason. As you can imagine, when you log in as root legitimately, this will send an email each time to the specified account and hence adds more weight to your already obese inbox. Here is one solution.
Replace the code we wrote before in the .bash_profile file with this:
echo "who|mail -s 'Someone logged in as root' your@email.com" | at now + 1 minEvery time someone logs in as root, a new task is scheduled to be executed one minute from the time the user logged in. This means that everytime an authorized person logs in as root, a task will be scheduled to run within a min. A notification email will then be sent to your designated email address. However, if you the administrator needs to log in frequently, the one minute delay should give you enough time to remove the task from the schedule (at least on a system that logs in quickly; can increase the delay to 2 minutes or more if necessary). This is similar to your home security system where you would usually have to disarm the system before it goes off. Disarming our "root access notifier" is as simple as removing it from the scheduled tasks.
To remove the task:
Or you can make a "Disarm" script with this: atq | cut -f1 | xargs atrmroot@desktop:~# atq // lists the scheduled tasks1 tue Jul 24 11:36:00 2012 a root
root@desktop:~# atrm 1 //removes a specific task by its id number
that you can quickly execute when necessary.
Resources/Good Reading:
unixmen.com: Best practices to secure your server
at command
Friday, April 27, 2012
Server monitoring with icinga
What is Icinga?
From the website, icinga.org,
"Icinga is an enterprise grade open source monitoring system which keeps watch over networks and any conceivable network resource, notifies the user of errors and recoveries and generates performance data for reporting"
If you are familiar with nagios, then you will most likely feel comfortable with icinga. Actually, icinga is a fork of nagios and uses its plugins for achieving many of its tasks.This system provides a very nice interface for monitoring systems and services on your network.
Installation and setup:
Installation will more than likely go smoothly if you can follow the instructions from icinga's documentation/quick start guide. I beleive there are packages for icinga in the debian/ubuntu repositories, so you can probably install by doing, apt-get install icinga. However, I installed it from it's sources by following the quickstart guide here.
NOTE: If you decide to create a different user other than icingaadmin from the command:
, you may run into minor set backs like i did. When i logged into the web interface with the unique username i created, i was unable to see the default localhost system being monitored. To get things working, i had to modify some files, and basically add my username to certain config directives so i have the relevant permissions to view/retrieve information. Specifically, the cgi.cfg config file in the icinga's etc directory. Below are the directives that i modified. Note that the user icingaadmin is there by default, so i only appended my username.
To add remote hosts to be monitored is also simple. I encourage you to read up on this post at howtoforge.com
Basically, if we wanted to add a system to be monitored that will only check for the system being up/alive (ping checks), we can create a config file for this host in the icinga's etc/modules directory. For example, we can name the file dhcp_server.cfg (files must end in .cfg extension).
Here is a sample of the config file contents for a simple ping host check.
Save this file the restart the icinga daemon: service icinga restart. If there are no errors all should be well. Log into the web interface and confirm that your new host is being monitored. If the host at 192.168.1.2 is down, then icinga's web interface will indicate so with the red color. The green color indicates that the host is up.
Resources/Good Reading:
www.icinga.org
howtoforge.com icinga article
From the website, icinga.org,
"Icinga is an enterprise grade open source monitoring system which keeps watch over networks and any conceivable network resource, notifies the user of errors and recoveries and generates performance data for reporting"
If you are familiar with nagios, then you will most likely feel comfortable with icinga. Actually, icinga is a fork of nagios and uses its plugins for achieving many of its tasks.This system provides a very nice interface for monitoring systems and services on your network.
Installation and setup:
Installation will more than likely go smoothly if you can follow the instructions from icinga's documentation/quick start guide. I beleive there are packages for icinga in the debian/ubuntu repositories, so you can probably install by doing, apt-get install icinga. However, I installed it from it's sources by following the quickstart guide here.
NOTE: If you decide to create a different user other than icingaadmin from the command:
htpasswd -c /usr/local/icinga/etc/htpasswd.users icingaadmin
, you may run into minor set backs like i did. When i logged into the web interface with the unique username i created, i was unable to see the default localhost system being monitored. To get things working, i had to modify some files, and basically add my username to certain config directives so i have the relevant permissions to view/retrieve information. Specifically, the cgi.cfg config file in the icinga's etc directory. Below are the directives that i modified. Note that the user icingaadmin is there by default, so i only appended my username.
authorized_for_system_information=icingaadmin,myusername
authorized_for_all_services=icingaadmin,myusername
authorized_for_all_hosts=icingaadmin,myusername
authorized_for_all_service_commands=icingaadmin,myusername
authorized_for_all_host_commands=icingaadmin,myusername
To add remote hosts to be monitored is also simple. I encourage you to read up on this post at howtoforge.com
Basically, if we wanted to add a system to be monitored that will only check for the system being up/alive (ping checks), we can create a config file for this host in the icinga's etc/modules directory. For example, we can name the file dhcp_server.cfg (files must end in .cfg extension).
Here is a sample of the config file contents for a simple ping host check.
define hostgroup{
hostgroup_name windows-machines
alias window machines
members dhcp_server
}
define host{
use windows-server
host_name dhcp_server
alias dhcp server
address 192.168.1.2
hostgroups windows-machines
}
define service{
use generic-service
host_name dhcp_server
service_description ping host
check_command check_ping!100.0,20%!500.0,60%
}
Save this file the restart the icinga daemon: service icinga restart. If there are no errors all should be well. Log into the web interface and confirm that your new host is being monitored. If the host at 192.168.1.2 is down, then icinga's web interface will indicate so with the red color. The green color indicates that the host is up.
Resources/Good Reading:
www.icinga.org
howtoforge.com icinga article
Thursday, March 8, 2012
More password cracking fun, with a twist.
The twist is, we wont be utilizing our CPU or GPU in the traditional sense of cracking a password hash. Let me explain.
In traditional password cracking, you have a hash file with hashes that you may have dumped from a database or operating system (like the sam file in windows or /etc/shadow in linux). You fire up your favorite password cracker like john the ripper, point to it your hash file and a wordlist then john does the rest. What's happening underneath the hood is that each word in the wordlist is ran through an algorithm (say md5 for example) and is thus converted to its hashed form. This hashed form of the word is then compared to the hashes in the hash file that was supplied to john the ripper. If there is a match, then the password was cracked.
Password crackers utilize the CPU or is some cases, the GPU, to do the computational work of converting the words in the wordlist files to their respective hash representations and then comparing them to a hash list. The amouont of words processed per second is dependent on the speed of the CPU or GPU and its not uncommon for password crackers like john and hashcat to process thousands of words per second.
Today, most of this processing work has gone into the cloud. There are many websites that offer password cracking services. You submit a hash, and withing a few seconds, if the hash is found, you will receive its plain text. Most of these services utilize rainbow tables which make for faster hash lookups, thus minimizing the time it takes to receive an answer.
Program: findmyhash.py
While exploring some of the new tools in the recently released bactrack 5 R2, i came across this tool. This tool will accept a hash or a list of hashes in a file and the hash type. It will then utilize various web resources to find you the resulting password in plaintext (this means an internet connection is required).
Usage is simple.
# python findmyhash.py MD5 -h "482c811da5d5b4bc6d497ffa98491e38"
Cracking hash: 482c811da5d5b4bc6d497ffa98491e38
Analyzing with md5hashcracker (http://md5hashcracker.appspot.com)...
***** HASH CRACKED!! *****
The original string is: password123
The following hashes were cracked:
----------------------------------
482c811da5d5b4bc6d497ffa98491e38 -> password123
Another useful utility is the hash identifier python script, which now comes bundled with hashcat in BT5 R2. This script aims to identify the hash type (md5, lm, ntlm, sha-1, etc)of given a hash. Just run the script and enter a hash and it the program will do its very best to identify the hash type. The findmyhash utility takes a hash type as one of its arguments so this hash identifier tool can be used to determine this.
usage: # python hash_id.py
Monday, February 20, 2012
Detecting xss vulnerabilities for cookie harvesting with owasp-zap
In my previous post, i demonstrated how one can use an automated tool like proxystrike to detect sql injection vulnerabilites. In this post, i will use a different tool called owasp-zap (my favorite interception proxy, only cause its free and burpsuite isn't completely free :( ). At its heart, zap (zed attack proxy), is very similar to tools like paros and burp suite. It can intercept http(s) request and responses, giving you the ability to modify the information containted in the requests and responses. It is also a web application scanner, that can look for common vulnerabilites like sql injection and xss. Now that we got that out of the way, onto the demo.
Like the previous post, we will be using the vulnerable web app, DVWA. We will run owasp-zap proxy and then re-configure firefox's proxy settings to run through the proxy (i do this through a firefox plugin called foxyproxy). I then browse the web app, then created a post using the guestbook feature. After the post was create, i instructed zap to perform a scan, using the POST request as the template (note that you can configure a scan policy that dictates what vulnerabilities to look for. From the menu's, Analyze -> Scan policy). The POST request was the one that was sent when we submitted the information we entered in the guestbook.
When zap finds a vulnerability, its is logged in the alert tab. Using the information that I found about the vulnerability in the alert tab, i then go onto inject some script, that would allow us to harvest session cookies. These cookies can then be used to hijack the sessions of other logged on users.
Friday, February 17, 2012
Using proxystrike to deteck sql injection vulnerabilities
I've touched on exploiting sql injection in previous blog posts. I gave some tips on how to manually test inputs for sql injection, but this is a very time consuming process. There are many potential injection points in one web app, and manually identifying each is a task in itself. Surely there must be a better way of identifying these vulnerabilities. So lets answer the follow question; How do security people automate the detection of sql injection vulnerabilities in web apps?
Usually, you will use special purpose scanners (designed for web application testing). There are many web app scanners that do a good job at detecting sql injection. However, no tool is perfect and its is recommended to not rely on any one tool. If you have 3 web app scanners, run them all then compare your results. Also keep in mind that it is possible that your scanner wont find every flaw in the application, so it is absolutely mandatory to have some knowledge of performing these tests yourself manually, to verify scanner results.
One tool that i find useful in detecting sql injection flaws is proxystrike. Proxystrike is a proxy/scanner that looks for sql and xss vulnerabilities. From the proxystrike documentation;
In the video below, i demonstrate how proxystrike makes it easy to detect sql injection vulnerabilities. I use DVWA (damn vulnerable web app) in the demo. To verify the vulnerability found by proxystrike, i used sqlmap to test and exploit the flaw. The end result was a dump of all the databases on the database server.
proxystrike
Usually, you will use special purpose scanners (designed for web application testing). There are many web app scanners that do a good job at detecting sql injection. However, no tool is perfect and its is recommended to not rely on any one tool. If you have 3 web app scanners, run them all then compare your results. Also keep in mind that it is possible that your scanner wont find every flaw in the application, so it is absolutely mandatory to have some knowledge of performing these tests yourself manually, to verify scanner results.
One tool that i find useful in detecting sql injection flaws is proxystrike. Proxystrike is a proxy/scanner that looks for sql and xss vulnerabilities. From the proxystrike documentation;
The process is very simple, ProxyStrike runs like a passive proxy listening on port 8008 by default, so you have to browse the desired web site setting your browser to use ProxyStrike as a proxy, and ProxyStrike will analyze all the paremeters in background mode. For the user it is a passive proxy because you won’t see any difference in the behaviour of the application, but in the background it is very active.
In the video below, i demonstrate how proxystrike makes it easy to detect sql injection vulnerabilities. I use DVWA (damn vulnerable web app) in the demo. To verify the vulnerability found by proxystrike, i used sqlmap to test and exploit the flaw. The end result was a dump of all the databases on the database server.
proxystrike from aerokid240 on Vimeo.
Resources / Good Reading:proxystrike
Monday, January 23, 2012
Local priv escalation - linux kernel 2.6.39 and up
Today, i noticed a new local privilege escalation exploit on exploit-db.com, and decided to check that out. Initially i thought it might be an exploit for very old Linux kernels but that certainly wasn't the case (here is the advisory on securityfocus.com). I figured that i would try this on one of my VMs when i got home from work, but i was a little too impatient. I thought i would remote desktop to my systems and get started. Before i attempted this, i figured why not verify the kernel version of my host machine before initiating a remote desktop session. My laptop is running backtrack 5 R1. So i typed, "uname -sr" and was given the output "Linux 2.6.39.4". Very interesting i thought. Hmm, i figured i'll try it here before any of my VMs (yea i know, bad practice to try someone else's code on a host system before trying it out on your test bench, but i'm not perfect :-P). I went over to exploit-db.com and downloaded the exploit and got to work.
First i made sure i was logged in as an unpriveleged user.
Commands: whoami && id
Output:
noobuser
uid=1001(noobuser) gid=1001(noobuser) groups=1001(noobuser)
I complied the code using: gcc -o local_exploit 18411.c
Then i executed the exploit: ./exploit
I was then greeted with another shell. I then verified who i was logged in as.
Commands: whoami && id
Output:
root
uid=0(root) gid=0(root) groups=1001(noobuser)
There you have it. Even an account named noobuser can pwn systems and become root with lil effort. Unfortunately, noobuser will still continue to be considered anything but elite, atleast in the security community :(.
Tuesday, January 17, 2012
OpenVPN revisited
I already touch on the basics on setting up openvpn. In that setup, a remote client(or clients) will only be able to connect to the server and access it's services. This time i want to share a little bit of knowledge on setting things up where remote clients can communicate with other devices on the server network.
Network setup:
Internal:
[router:192.168.1.1]
[client1:192.168.1.100] [client2:192.168.1.101]
Server:
[internal:192.168.1.10] - [vpn:10.10.10.1]
VPN clients:
[vpn:remote user:10.10.10.2]
The server is connected to an internal network, 192.168.1.0/24. When the VPN link is establiished, the vpn network of 10.10.10.0/24 will be established and the server will get the ip address of 10.10.10.1, while connecting clients will get different addresses from the vpn's address pool. Now if you've followed my previous openvpn setup, the remote client would only be able to communicate with that server. However many businesses require that remote vpn users have access to the entire subnet's resources. As you will see, upgrading to this setup is quite simple.
Here are the client and server configs:
Server:
The "daemon" directive tells openvpn to run in the background and send all output and error messages to a syslog file such as /var/log/syslog or /var/log/messages.
Including the "server 10.10.10.0 255.255.255.0" setting defines the vpn address pool. The first address, 10.10.10.1, will be assigned to the vpn server's tun interface.
The push "route 192.168.1.0 255.255.255.0" setting allows the server to advertise this subnet to connecting clients. When a remote client connects to the vpn server, a route will be added for the subnet 192.168.1.0/24, in that client's routing table.
The ifconfig-pool-persist ipp.txt
The "nobind" directive in the client config simply tells the client to not bind to any address and port. This directive is only suitable for clients.
Very Important things to note:
If you were to use the sample configuration files above as is, you will only have proper communication to the server, but not the subnet behind the server. This is what happens if vpn client 10.10.10.2 tried to ping 192.168.1.100; Since the clients will now have a route added for the 192.168.1.0/24 network, the ping packet will get sent over the vpn tunnel. The server already has a route to the internal network so the packet will be routed, ONLY if after setting up forwarding :). In linux you do this by typing the following in a terminal: "echo "1" > /proc/sys/net/ipv4/ip_forward". This turns your machine into a basic router. Without this, your machine will drop all packets that aern't ment for itself. So assuming we have forwarding in place, our inital ping packet will get forwarded to the internal host. Now we run into more problems.
The internal host will recieve the packet but since it doesn't have a route for the vpn client's network (10.10.10.0/24), it will send its response to its default gateway ( routers in most cases), then the router will consult its internal routing table and learn that it has no route for that network then forward the packet to its default gateway, and so on until the packet is dropped. Note that addresses such as 192.168.0.0 and 10.0.0.0 are dropped by routers on the internet as they are flagged as non-route-able addresses.
The solution to this is to add a route to the default gateway. For me, this would be the router, so i would log onto the routers web interface and goto the routing settings and add a maunal route for the 10.10.10.0/24 network to forward packets to the vpn server, 192.168.1.1.
Now, instead of our router forwarding the packets on the internet (where they will eventually be dropped), since we have an entry for the 10.10.10.0/24 network in the gateways routing table, the packets will be forwarded to the vpn server. Again, we run into another problem, NAT. I suggest that you read up on NAT (network address translation), as it can be quite a challenge to define its purpose and what it is. Therefore i will leave that up to you and your googling skills.
However, the solution to the NAT problem takes only one command on the linux terminal:
"iptables -t nat -A POSTROUTING -s 10.10.10.0/24 -o eth0 -j MASQUERADE"
Now everything should be up and working. Remote vpn clients should now be able to communicate successfully with the other hosts on the servers internal network. Try pinging the other hosts to verify connectivity and if all is well, tap yourself on the shoulder.
Network setup:
Internal:
[router:192.168.1.1]
[client1:192.168.1.100] [client2:192.168.1.101]
Server:
VPN clients:
[vpn:remote user:10.10.10.2]
The server is connected to an internal network, 192.168.1.0/24. When the VPN link is establiished, the vpn network of 10.10.10.0/24 will be established and the server will get the ip address of 10.10.10.1, while connecting clients will get different addresses from the vpn's address pool. Now if you've followed my previous openvpn setup, the remote client would only be able to communicate with that server. However many businesses require that remote vpn users have access to the entire subnet's resources. As you will see, upgrading to this setup is quite simple.
Here are the client and server configs:
Server:
dev tunClient:
port 1194
proto udp
daemon
server 10.10.10.0 255.255.255.0
ca ca.crt
cert server.crt
key server.key
dh dh1024.pem
push "route 192.168.1.0 255.255.255.0"
ifconfig-pool-persist ipp.txt
keepalive 10 120
comp-lzo
max-clients 100
user nobody
group nogroup
persist-key
persist-tun
clientThings to note:
dev tun
proto udp
remote 11.22.33.44 1194
resolve-retry infinite
nobind
ca ca.crt
cert client.crt
key client.key
comp-lzo
user nobody
group nogroup
verb 3
The "daemon" directive tells openvpn to run in the background and send all output and error messages to a syslog file such as /var/log/syslog or /var/log/messages.
Including the "server 10.10.10.0 255.255.255.0" setting defines the vpn address pool. The first address, 10.10.10.1, will be assigned to the vpn server's tun interface.
The ifconfig-pool-persist ipp.txt
The "nobind" directive in the client config simply tells the client to not bind to any address and port. This directive is only suitable for clients.
Very Important things to note:
If you were to use the sample configuration files above as is, you will only have proper communication to the server, but not the subnet behind the server. This is what happens if vpn client 10.10.10.2 tried to ping 192.168.1.100; Since the clients will now have a route added for the 192.168.1.0/24 network, the ping packet will get sent over the vpn tunnel. The server already has a route to the internal network so the packet will be routed, ONLY if after setting up forwarding :). In linux you do this by typing the following in a terminal: "echo "1" > /proc/sys/net/ipv4/ip_forward". This turns your machine into a basic router. Without this, your machine will drop all packets that aern't ment for itself. So assuming we have forwarding in place, our inital ping packet will get forwarded to the internal host. Now we run into more problems.
The internal host will recieve the packet but since it doesn't have a route for the vpn client's network (10.10.10.0/24), it will send its response to its default gateway ( routers in most cases), then the router will consult its internal routing table and learn that it has no route for that network then forward the packet to its default gateway, and so on until the packet is dropped. Note that addresses such as 192.168.0.0 and 10.0.0.0 are dropped by routers on the internet as they are flagged as non-route-able addresses.
The solution to this is to add a route to the default gateway. For me, this would be the router, so i would log onto the routers web interface and goto the routing settings and add a maunal route for the 10.10.10.0/24 network to forward packets to the vpn server, 192.168.1.1.
Now, instead of our router forwarding the packets on the internet (where they will eventually be dropped), since we have an entry for the 10.10.10.0/24 network in the gateways routing table, the packets will be forwarded to the vpn server. Again, we run into another problem, NAT. I suggest that you read up on NAT (network address translation), as it can be quite a challenge to define its purpose and what it is. Therefore i will leave that up to you and your googling skills.
However, the solution to the NAT problem takes only one command on the linux terminal:
"iptables -t nat -A POSTROUTING -s 10.10.10.0/24 -o eth0 -j MASQUERADE"
Now everything should be up and working. Remote vpn clients should now be able to communicate successfully with the other hosts on the servers internal network. Try pinging the other hosts to verify connectivity and if all is well, tap yourself on the shoulder.
Wednesday, January 11, 2012
Various Server services: Best Practice - compilation
This blog post will combine some of the best resources that i could find regarding server setups and best practices. Services will include web server (http), ssh, ftp etc. Of course you can find these on your own but why go through dozens of search engine results just to find that 80% of them aern't that useful, when I've done most of the hard stuff for you :).
SSH server (openssh):
Link 1: cyberciti.biz
Link 2: howtoforge.com
Link 3: teknoteknik.wordpress.com
FTP server(vsftpd):
Link 1: Ubuntu Server documentation
Link 2: brainsware.org vsftpd virtual users
Link 3: Centos.org vsftpd config options
Link 4: SFTP vs FTPS
Web Server (apache):
Link 1: apache.orgs tutorial collection (Best list)
Link 1: yolinux.com
Database server (mysql):
Link 1: ubuntu server documentation
Link 2: greensql.com
dhcp server (dhcpd):
Link 1: Ubuntu server documentation
Link 2: Article at consultingblogs.emc.com (very good read)
As i find more interesting articles, i will update this blog post. If you are interested in implementing any of the above services or just looking for some best practices, hopefully you will find these resources useful as i have.
Sunday, January 1, 2012
Binary Kung-Fu - Manually create a working windows PE file using a hexeditor
Sure you can open up visual basic or visual c++ and write your own exe in less than 5 minutes. Why would you want to do this manually with a hex editor? Well for one its fun doing this for the first time on your own, but most importantly, it teaches you a heck of alot. You learn what makes up an exe and how windows uses the data in the executable to map things into memory, etc. It goes without saying that the more you know about something and how it works, the better you will be at fixing potential problems that may arise and also manipulating the component to do other things that it wasn't intended to do in the first place (i.e hacking).
Who might find this useful or where might this knowledge be implemented?
1. Reverse Engineering.
2. Malware Analysis. Malware authors tend to do some pretty darn cool tricks with the PE headers, like actually writing/hiding code in the headers itself.
3. Antivirus research.
4. Exploit research
What you will need.
1. Windows OS. I used windows XP service pack 2 in virtualbox.
2. A hex editor. The one i'm most familiar with is HxD which is freeware.
3. LordPE (edit PE file headers).
4. PE file format reference. You can google "pe file format" and you should get some useable documents. I like the one at pentest.cryptocity.net.
At this point, you should look up the meaning of "little/big Endian" with relation to x86 processors. Certain values in PE files are interpret by windows in a sort of reverse order. For example, a dword (4 bytes) to represent the value of two will be "02 00 00 00". When windows reads this dword, it reads it in reverse as "00 00 00 02".
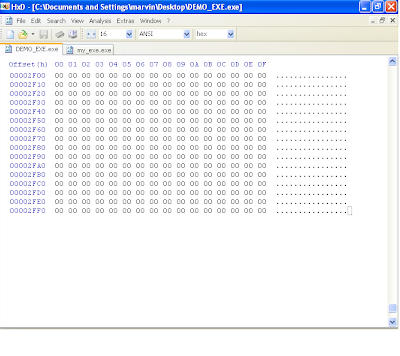
The first thing to do is open up your hexeditor and create a new project. One important thing that you should be aware of is that although the PE file header can be complex, not all of the fields are of importance to us in order to getting our executable running. However, that doesnt mean we will omit them from the header. We will just have to pad these fields with zeros.
Ok lets start...
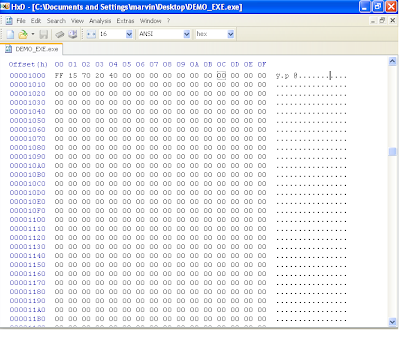
Every PE file requires a DOS header. If you analyze most PE files, you will notice like within the first 100 bytes or so, there is some text saying something along the lines of "This program must be run under win32". The DOS header is there for backwards compatibility on 16bit DOS systems. If you attempted to run a win32 program in 16bit DOS, then it will simply print that message then quit.
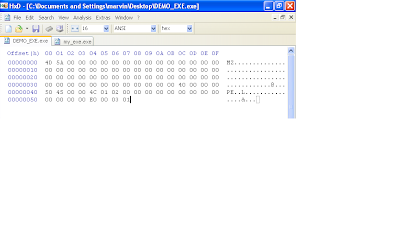
In the windows 32bit environment, the windows loader only cares about two fields in the DOS header. The first 2 bytes should be "MZ" and the last 4 bytes contains the offset within the file where the PE header starts. The DOS header is 64 bytes long (0x40).
Note: that you would notice the last 4 bytes (as shown in the image below) are "40 00 00 00". Remember the little indian description i gave earlier? When windows reads this file, its gonna take those 4 bytes and flip it around so as you'll get "00 00 00 40" or 0x00000040 (hexadecimal 40). This means that at offset 0x40, windows should look for the PE header.

The next 24 bytes will have the PE signature and image file header. You will notice that i didn't input the typical DOS message "This program must be run under win32", after the DOS header because like i mentioned before, in a win32 environment, the windows executable loader only looks for two things in the DOS header (the MZ signature and the pointer to the PE header (This pointer is at offser 0x3c in the DOS header ) . Also note that we will zero out some of the fields in the image file header. Remember the DOS header is 64 bytes (0x40) long so therefore we will start with the PE signature here at offset 0x40.
In the hex editor, append 24 bytes of zeros to your file so we have the correct length in place for this structure that holds the PE signature and image file structure. Now at offset 0x40, overwrite the first 4 bytes with "50 45 00 00", which is the "PE" signature. At offset 0x44, write "4c 01". This here means that this program is intended to be ran on an intel i386 platform. The next two bytes are the number of sections. We are gonna use two sections, so write "02 00". The next 12 bytes are not important so just leave them zero'd out. At offset 0x54, enter "E0 00" and at offset 0x56, enter "03 01". Offset 0x54 is important and specifies how big the next structure beginning at offset 0x58 should be (this structure is the NT_OPTIONAL_HEADERS field). We derived this value by adding the size of the optional NT header which is 0x60 (96 bytes) and the size of the image data directories. Each entry in the data directories is 8 bytes long and we have up to 16 entries (this equates to 128 bytes). So 96 plus 128 bytes is 224 bytes (or 0xE0). Offset 0x56 is rather complicated. The values in this field can determine whether this file is a dll or executable, if a 32 bit machine is expected and so forth. Its best to observe this field in LordPE. I copied the values for this field in another executable "03 01".
 Since we specified in at offset 0x54 that the NT optional header was gonna be 224 bytes (0xE0) long, lets pad our file with 224 bytes as well. Remember, in our file, the NT optional header structure starts at offset 0x58.
At offset 0x58, enter bytes "0B 01". These two bytes tells windows that this is a PE32 file.
From offset 0x5A, the next 14 bytes are not important and can remain all zeros. This takes us to offset 0x68. This field is a dword (4 bytes) and takes an RVA (Relative Virtual Address). An RVA is an offset that is added to a base address. For example, if a base address is 0x00400000 and the RVA to a function named "OpenFile" is "2000", then this equates the function being located at 0x00402000. There are quite a few fields that contain an RVA, but just remember that an RVA is always an offset that is added to the base address (the base address will be defined shortly is the NT optional header) in order to find the location of that object in Virtual memory. RVA's never point to an offset in the executable file. Lets get back on track. At offset 0x68 we will write a dword for an RVA representing the AddressOfEntryPoint (address of entry point is where our program will begin executing code after it is loaded into memory). We write "00 10 00 00". The next 8 bytes are not important so leave them zero'd.
We are now at offset 0x74. This field is the image base that i refered to before as i was explaining RVAs. This field takes a dword and i will use " 00 00 40 00".
The next 8 bytes define the section alignment and the file alignment respectively. They are both dword values. We will keep them the same for simplicity, "00 10 00 00" and "00 10 00 00". It is hard to find the right words to explain section and file alignment, although the concept is quite simple, but i'll try. Imagine a executable file with three sections, each named A, B and C. Sections are like containers, each with a different purpose. Section A can contain the assembly code, section B can contain strings that the programmer hard coded (like passwords, error messages, message box strings, etc and section C can also contain other data. Its not hard to tell that these sections are treated differently, one can be interpreted as code, the others as data. Because of this, sections have attributes, like read, write, execute, etc. Section/file alignment aids the windows loader in identifying the boundaries of each section, so that it correctly knows which parts should be executable and which parts shouldn't. For instance, we have a base image that we defined earlier of 0x00400000. We can have a section alignment of 0x1000. What this means is that we can have a section located at 0x00401000. Lets say section A had 0x50 bytes of code in its section, because of section alignment value of 0x1000, the next section, section B, will reside at 0x00402000. What if section B had 0x15o0 bytes of data. Doing the math, since section B starts at 0x00402000 + 0x1500 0f data, we get 0x00403500. Because thing are alingned at blocks of 0x1000 bytes, section C will begin at 0x00404000. All the while we were talking about section alignment, we were referring to how things are aligned in memory. The file alingment represents how the sections are aligned in the file. For simplicity sake, i gave it the same value as with the section alignment.
We should now be at offset 0x80. The next 28 bytes define fields that are not important to us so leave them filled with zeros.
Update: Actually the definition at offset 0x88 (MajorSubsystemVersion), is a necessary field. This field is two bytes and i used "04 00". Another important field is the SizeOfHeaders field at offset 0x94. This is also an important field, and thankfully, lordpe can populate this field for us quite easily by the push of a button.
This brings us to offset 9c. This field takes a word (2 bytes) that define the subsystem (this indicates if this will be a console application or gui application, etc.). For console mode, we enter the values "03 00". The next 22 bytes can remain zero'd out. At offset 0xB4, this field represents (NumberOfRvaAndSizes) which indicates how many entries will be in the Data directory structure. I will be using the values "10 00 00 00" to indicate 0x10 which is 16 in decimal. This means the windows loader expects to find an array of 16 entries in the image data directory structure which follows next.
We should be at offset 0xB8 ready to initialize our data directory structure. Each entry consists of two dwords (8 bytes). The first list an RVA and the second is a size. We are only interested in adding an import table which is the second entry in the data directory structure. Therefore the first 8 bytes will be zero's, the next 4 will contain the RVA for the import table and the next 4 will define the size of the import table (our import entry RVA will be "00 20 00 00" and we will set the size to "00 10 00 00" ). The remaining 112 bytes represent the rest of the data directory structure and will remain zero'd out. We should now have a hexdump that looks like this.
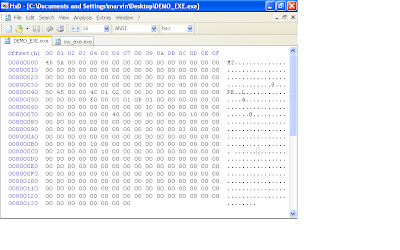 Next we're onto the final stage of defining our PE header. This will include the section header definitions, If you recall earlier, we defined our NumberOfSection's field in the file header section as "02 00", so therefore, we are expected to define two sections in the section header. Each section is 40 bytes so lets go ahead and add 80 bytes to our file. Again not all fields in this structure are important to us so some will remain zero'd out.
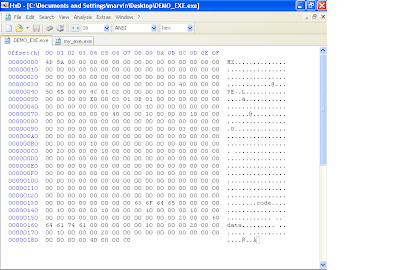
We are currently at offset 0x138 where we will begin our section header definitions. The first 8 bytes are reserved for the section header name. Following good practice, we will make sure we dont use over 7 bytes, just so that our string is null terminated. We will call our first section "code" and append the remaining 8 bytes like so "63 6F 64 65 00 00 00 00". The next 4 bytes is the virtual size definition, and we will set it "00 10 00 00". The next 4 bytes is the RVA for this "code" section. We will use "00 10 00 00". Remember, RVAs get added to the base address, which in our case is 0x00400000, which will result in 0x00401000 being the location in memory where this code "section" will be found. So based on our definition so far, the virtual address for the "code" section is 0x00401000 and its size is 0x1000 (0x00401000 + 0x1000 = 0x00402000). In reality this section can be any size, but due to our definition in the section alignment field (defined in the NT optional header), the sections will always be aligned in blocks of 0x1000. Therefore our second section will begin at 0x00402000 because our section size is less than 0x1000.
Ok, the next 4 bytes define the size of the raw data (data on disk or in the file, not virtual size). Lets give it "00 10 00 00". The next 4 bytes indicate the offset to this section in the file (not in memory). Lets give it "00 10 00 00". The next 12 bytes will be left with zeros. Now the last 4 bytes of our first section header definition indicates the attributes this section should have, like read, write, execute, etc. This field is quite complex and you can use LordPE to help obtain the value you need. Open up another exe in lordpe and observe the section characteristics each section of that executable posses. LordPE will give you the 4 bytes that represent the resulting characteristics of that section. You can simply copy this to your exe.
Do the same for the second section header definition, but note that the RVAs and size of raw data definitions will be different. This is what your hexdump should look like at this point after adding the second section header definition.
LordPe should be able to parse your file now so open it up. LordPE can help point out your mistakes, and allow you to potentially correct them from in there.
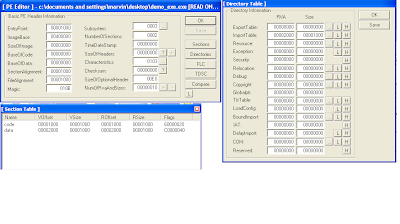 You will notice that the size of image is now 0x3000 in LordPE, even though we didn't define it. Thanks to LordPE, it was able to parse the headers and determine what the image size should be. LordPE can also calculate the SizeOfHeaders field and the checksum field automatically for us (in my tests, the checksum field was not necessary and could be left all zero'd).
We have completed defining our PE headers, but we are not finished with the exe. With our two section definitions, we definied some fields, size of raw data and a pointer to raw data. According to our definitions, we should have a text and data section of size 0x1000 (4096 bytes). The text section has a pointer to raw data at file (not virtual) offset 0x1000, while the data section has a file offset of 0x2000. This means that when windows attempts to parse the file it will look at our section header definition and see that the sections are pointing to offsets that dont exist, at least at this point (our file size is not even half of 0x1000 at this point). We will need to pad our file with bytes in accordance to what we indicated in the section headers. Since our last section is the data section, and its size was indicated to be 0x1000, our total file size should be the pointer to raw data of the "data" section + size of raw data for the "data" section as well (0x2000 + 0x1000 = 0x3000). Lets fill or pad our file with zero's till our file size is 0x3000.
IMPORTANT: I cannot stress enough how important it is that you get this file size right. If your file was 0x3001 bytes in size or 0x2FFF (basically if its not exactly 0x3000)and you try to run your file, windows will give you an error saying that the file is not a proper exe file. Basically windows parsed the headers and found a discrepancy between what the header says the file size should be and what it actually is on disk.
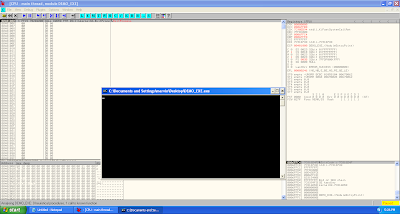
 So far, we should have a good executable that windows will be able to accept and parse. However, this program has no code and will crash. If you open up this file in a debugger like ollydbg, it will open up successfully (if you made a mistake following the steps before, ollydbg would not be able to open the file).
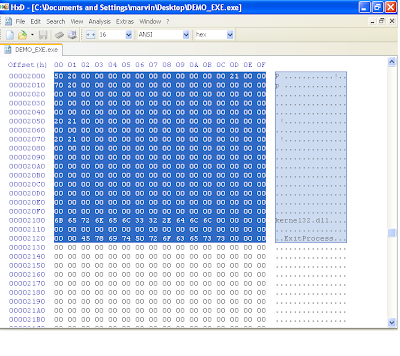
You will be dropped to the address of entry point (remeber the rva was 0x1000, therefore the base address 0x00400000 + 0x1000 = 0x00401000). This is essentially the "code" section that we defined earlier. Windows is expecting to execute code here but initially, all that is there is a bunch of zero's. Therefore the program crashes. We will need to write meaningful code here. The simplest program i can think of as of this writing was to write code that simply exits. This wouldn't do anything of significance but at least our program will no longer crash as the ExitProcess kernel32 api will cause our program to exit gracefully. To get this functionality, two more things need to be done.
1. We need to define an image import structure for our kernel32.dll. This will have a pointer to another pointer that will point to the "ExitProcess" api found within kernel32.dll.
2. We will need to write code that will simply call the function. Generating the relevant code can be made simple by using a debugger like olly. Here are the bytes that i used at offset 0x1000, i.e, the "code" section and also the AddressOfEntrypoint RVA. "FF 15 70 20 40 00". You can see screen shots of how i set up offset 0x1000 and 0x2000 in my file.
Congratulations !!!. At this point, you should have a working PE executable file that simply just exits. If you wanted more functionality, you would need to import DLLs. Therefore, you would need to make sure that each dll has an entry in the image import descriptor structure (in our example, we only had one for kernel32.dll) and then the functions that these dlls provide must be defined like we did with "ExitProcess" (Note that function names ARE case sensitive). The rest is dependent on your assembly skills, to manipulate the registers and setup the stack for the relevant functions calls to make a reasonable program.
I hope this was helpful to some and would be used as a reference for researchers. I recommend reading the following references below as they've provided me with all the necessary information that i need to succeed at this binary hackery.
Resources / Good Reading:
Hxd hex editor
Tiny Pe project
Pentest.cryptocity.net PE format PDF
LordPE
Microsoft PE Header structure definitions
Who might find this useful or where might this knowledge be implemented?
1. Reverse Engineering.
2. Malware Analysis. Malware authors tend to do some pretty darn cool tricks with the PE headers, like actually writing/hiding code in the headers itself.
3. Antivirus research.
4. Exploit research
What you will need.
1. Windows OS. I used windows XP service pack 2 in virtualbox.
2. A hex editor. The one i'm most familiar with is HxD which is freeware.
3. LordPE (edit PE file headers).
4. PE file format reference. You can google "pe file format" and you should get some useable documents. I like the one at pentest.cryptocity.net.
At this point, you should look up the meaning of "little/big Endian" with relation to x86 processors. Certain values in PE files are interpret by windows in a sort of reverse order. For example, a dword (4 bytes) to represent the value of two will be "02 00 00 00". When windows reads this dword, it reads it in reverse as "00 00 00 02".
The first thing to do is open up your hexeditor and create a new project. One important thing that you should be aware of is that although the PE file header can be complex, not all of the fields are of importance to us in order to getting our executable running. However, that doesnt mean we will omit them from the header. We will just have to pad these fields with zeros.
Ok lets start...
Every PE file requires a DOS header. If you analyze most PE files, you will notice like within the first 100 bytes or so, there is some text saying something along the lines of "This program must be run under win32". The DOS header is there for backwards compatibility on 16bit DOS systems. If you attempted to run a win32 program in 16bit DOS, then it will simply print that message then quit.
In the windows 32bit environment, the windows loader only cares about two fields in the DOS header. The first 2 bytes should be "MZ" and the last 4 bytes contains the offset within the file where the PE header starts. The DOS header is 64 bytes long (0x40).
Note: that you would notice the last 4 bytes (as shown in the image below) are "40 00 00 00". Remember the little indian description i gave earlier? When windows reads this file, its gonna take those 4 bytes and flip it around so as you'll get "00 00 00 40" or 0x00000040 (hexadecimal 40). This means that at offset 0x40, windows should look for the PE header.

The next 24 bytes will have the PE signature and image file header. You will notice that i didn't input the typical DOS message "This program must be run under win32", after the DOS header because like i mentioned before, in a win32 environment, the windows executable loader only looks for two things in the DOS header (the MZ signature and the pointer to the PE header (This pointer is at offser 0x3c in the DOS header ) . Also note that we will zero out some of the fields in the image file header. Remember the DOS header is 64 bytes (0x40) long so therefore we will start with the PE signature here at offset 0x40.
In the hex editor, append 24 bytes of zeros to your file so we have the correct length in place for this structure that holds the PE signature and image file structure. Now at offset 0x40, overwrite the first 4 bytes with "50 45 00 00", which is the "PE" signature. At offset 0x44, write "4c 01". This here means that this program is intended to be ran on an intel i386 platform. The next two bytes are the number of sections. We are gonna use two sections, so write "02 00". The next 12 bytes are not important so just leave them zero'd out. At offset 0x54, enter "E0 00" and at offset 0x56, enter "03 01". Offset 0x54 is important and specifies how big the next structure beginning at offset 0x58 should be (this structure is the NT_OPTIONAL_HEADERS field). We derived this value by adding the size of the optional NT header which is 0x60 (96 bytes) and the size of the image data directories. Each entry in the data directories is 8 bytes long and we have up to 16 entries (this equates to 128 bytes). So 96 plus 128 bytes is 224 bytes (or 0xE0). Offset 0x56 is rather complicated. The values in this field can determine whether this file is a dll or executable, if a 32 bit machine is expected and so forth. Its best to observe this field in LordPE. I copied the values for this field in another executable "03 01".
 Since we specified in at offset 0x54 that the NT optional header was gonna be 224 bytes (0xE0) long, lets pad our file with 224 bytes as well. Remember, in our file, the NT optional header structure starts at offset 0x58.
At offset 0x58, enter bytes "0B 01". These two bytes tells windows that this is a PE32 file.
From offset 0x5A, the next 14 bytes are not important and can remain all zeros. This takes us to offset 0x68. This field is a dword (4 bytes) and takes an RVA (Relative Virtual Address). An RVA is an offset that is added to a base address. For example, if a base address is 0x00400000 and the RVA to a function named "OpenFile" is "2000", then this equates the function being located at 0x00402000. There are quite a few fields that contain an RVA, but just remember that an RVA is always an offset that is added to the base address (the base address will be defined shortly is the NT optional header) in order to find the location of that object in Virtual memory. RVA's never point to an offset in the executable file. Lets get back on track. At offset 0x68 we will write a dword for an RVA representing the AddressOfEntryPoint (address of entry point is where our program will begin executing code after it is loaded into memory). We write "00 10 00 00". The next 8 bytes are not important so leave them zero'd.
We are now at offset 0x74. This field is the image base that i refered to before as i was explaining RVAs. This field takes a dword and i will use " 00 00 40 00".
The next 8 bytes define the section alignment and the file alignment respectively. They are both dword values. We will keep them the same for simplicity, "00 10 00 00" and "00 10 00 00". It is hard to find the right words to explain section and file alignment, although the concept is quite simple, but i'll try. Imagine a executable file with three sections, each named A, B and C. Sections are like containers, each with a different purpose. Section A can contain the assembly code, section B can contain strings that the programmer hard coded (like passwords, error messages, message box strings, etc and section C can also contain other data. Its not hard to tell that these sections are treated differently, one can be interpreted as code, the others as data. Because of this, sections have attributes, like read, write, execute, etc. Section/file alignment aids the windows loader in identifying the boundaries of each section, so that it correctly knows which parts should be executable and which parts shouldn't. For instance, we have a base image that we defined earlier of 0x00400000. We can have a section alignment of 0x1000. What this means is that we can have a section located at 0x00401000. Lets say section A had 0x50 bytes of code in its section, because of section alignment value of 0x1000, the next section, section B, will reside at 0x00402000. What if section B had 0x15o0 bytes of data. Doing the math, since section B starts at 0x00402000 + 0x1500 0f data, we get 0x00403500. Because thing are alingned at blocks of 0x1000 bytes, section C will begin at 0x00404000. All the while we were talking about section alignment, we were referring to how things are aligned in memory. The file alingment represents how the sections are aligned in the file. For simplicity sake, i gave it the same value as with the section alignment.
We should now be at offset 0x80. The next 28 bytes define fields that are not important to us so leave them filled with zeros.
Update: Actually the definition at offset 0x88 (MajorSubsystemVersion), is a necessary field. This field is two bytes and i used "04 00". Another important field is the SizeOfHeaders field at offset 0x94. This is also an important field, and thankfully, lordpe can populate this field for us quite easily by the push of a button.
This brings us to offset 9c. This field takes a word (2 bytes) that define the subsystem (this indicates if this will be a console application or gui application, etc.). For console mode, we enter the values "03 00". The next 22 bytes can remain zero'd out. At offset 0xB4, this field represents (NumberOfRvaAndSizes) which indicates how many entries will be in the Data directory structure. I will be using the values "10 00 00 00" to indicate 0x10 which is 16 in decimal. This means the windows loader expects to find an array of 16 entries in the image data directory structure which follows next.
We should be at offset 0xB8 ready to initialize our data directory structure. Each entry consists of two dwords (8 bytes). The first list an RVA and the second is a size. We are only interested in adding an import table which is the second entry in the data directory structure. Therefore the first 8 bytes will be zero's, the next 4 will contain the RVA for the import table and the next 4 will define the size of the import table (our import entry RVA will be "00 20 00 00" and we will set the size to "00 10 00 00" ). The remaining 112 bytes represent the rest of the data directory structure and will remain zero'd out. We should now have a hexdump that looks like this.
 Next we're onto the final stage of defining our PE header. This will include the section header definitions, If you recall earlier, we defined our NumberOfSection's field in the file header section as "02 00", so therefore, we are expected to define two sections in the section header. Each section is 40 bytes so lets go ahead and add 80 bytes to our file. Again not all fields in this structure are important to us so some will remain zero'd out.
We are currently at offset 0x138 where we will begin our section header definitions. The first 8 bytes are reserved for the section header name. Following good practice, we will make sure we dont use over 7 bytes, just so that our string is null terminated. We will call our first section "code" and append the remaining 8 bytes like so "63 6F 64 65 00 00 00 00". The next 4 bytes is the virtual size definition, and we will set it "00 10 00 00". The next 4 bytes is the RVA for this "code" section. We will use "00 10 00 00". Remember, RVAs get added to the base address, which in our case is 0x00400000, which will result in 0x00401000 being the location in memory where this code "section" will be found. So based on our definition so far, the virtual address for the "code" section is 0x00401000 and its size is 0x1000 (0x00401000 + 0x1000 = 0x00402000). In reality this section can be any size, but due to our definition in the section alignment field (defined in the NT optional header), the sections will always be aligned in blocks of 0x1000. Therefore our second section will begin at 0x00402000 because our section size is less than 0x1000.
Ok, the next 4 bytes define the size of the raw data (data on disk or in the file, not virtual size). Lets give it "00 10 00 00". The next 4 bytes indicate the offset to this section in the file (not in memory). Lets give it "00 10 00 00". The next 12 bytes will be left with zeros. Now the last 4 bytes of our first section header definition indicates the attributes this section should have, like read, write, execute, etc. This field is quite complex and you can use LordPE to help obtain the value you need. Open up another exe in lordpe and observe the section characteristics each section of that executable posses. LordPE will give you the 4 bytes that represent the resulting characteristics of that section. You can simply copy this to your exe.
Do the same for the second section header definition, but note that the RVAs and size of raw data definitions will be different. This is what your hexdump should look like at this point after adding the second section header definition.

LordPe should be able to parse your file now so open it up. LordPE can help point out your mistakes, and allow you to potentially correct them from in there.
 You will notice that the size of image is now 0x3000 in LordPE, even though we didn't define it. Thanks to LordPE, it was able to parse the headers and determine what the image size should be. LordPE can also calculate the SizeOfHeaders field and the checksum field automatically for us (in my tests, the checksum field was not necessary and could be left all zero'd).
We have completed defining our PE headers, but we are not finished with the exe. With our two section definitions, we definied some fields, size of raw data and a pointer to raw data. According to our definitions, we should have a text and data section of size 0x1000 (4096 bytes). The text section has a pointer to raw data at file (not virtual) offset 0x1000, while the data section has a file offset of 0x2000. This means that when windows attempts to parse the file it will look at our section header definition and see that the sections are pointing to offsets that dont exist, at least at this point (our file size is not even half of 0x1000 at this point). We will need to pad our file with bytes in accordance to what we indicated in the section headers. Since our last section is the data section, and its size was indicated to be 0x1000, our total file size should be the pointer to raw data of the "data" section + size of raw data for the "data" section as well (0x2000 + 0x1000 = 0x3000). Lets fill or pad our file with zero's till our file size is 0x3000.
IMPORTANT: I cannot stress enough how important it is that you get this file size right. If your file was 0x3001 bytes in size or 0x2FFF (basically if its not exactly 0x3000)and you try to run your file, windows will give you an error saying that the file is not a proper exe file. Basically windows parsed the headers and found a discrepancy between what the header says the file size should be and what it actually is on disk.
 So far, we should have a good executable that windows will be able to accept and parse. However, this program has no code and will crash. If you open up this file in a debugger like ollydbg, it will open up successfully (if you made a mistake following the steps before, ollydbg would not be able to open the file).
You will be dropped to the address of entry point (remeber the rva was 0x1000, therefore the base address 0x00400000 + 0x1000 = 0x00401000). This is essentially the "code" section that we defined earlier. Windows is expecting to execute code here but initially, all that is there is a bunch of zero's. Therefore the program crashes. We will need to write meaningful code here. The simplest program i can think of as of this writing was to write code that simply exits. This wouldn't do anything of significance but at least our program will no longer crash as the ExitProcess kernel32 api will cause our program to exit gracefully. To get this functionality, two more things need to be done.
1. We need to define an image import structure for our kernel32.dll. This will have a pointer to another pointer that will point to the "ExitProcess" api found within kernel32.dll.
2. We will need to write code that will simply call the function. Generating the relevant code can be made simple by using a debugger like olly. Here are the bytes that i used at offset 0x1000, i.e, the "code" section and also the AddressOfEntrypoint RVA. "FF 15 70 20 40 00". You can see screen shots of how i set up offset 0x1000 and 0x2000 in my file.


Congratulations !!!. At this point, you should have a working PE executable file that simply just exits. If you wanted more functionality, you would need to import DLLs. Therefore, you would need to make sure that each dll has an entry in the image import descriptor structure (in our example, we only had one for kernel32.dll) and then the functions that these dlls provide must be defined like we did with "ExitProcess" (Note that function names ARE case sensitive). The rest is dependent on your assembly skills, to manipulate the registers and setup the stack for the relevant functions calls to make a reasonable program.
I hope this was helpful to some and would be used as a reference for researchers. I recommend reading the following references below as they've provided me with all the necessary information that i need to succeed at this binary hackery.
Resources / Good Reading:
Hxd hex editor
Tiny Pe project
Pentest.cryptocity.net PE format PDF
LordPE
Microsoft PE Header structure definitions
Subscribe to:
Posts (Atom)